Steps to Make Homemade Dal Fry Varan

Steps to Make Homemade Dal Fry Varan

Dal Fry Varan.

Dal Fry Varan

Hello everybody, it is Drew, welcome to our recipe page. Today, I'm gonna show you how to prepare a special dish, dal fry varan. It is one of my favorites. For mine, I will make it a bit tasty. This will be really delicious.

Dal Fry Varan is one of the most favored of recent trending foods in the world. It is easy, it's quick, it tastes yummy. It is appreciated by millions daily. Dal Fry Varan is something that I've loved my whole life. They're nice and they look fantastic.

To begin with this recipe, we must prepare a few ingredients. You can have dal fry varan using 9 ingredients and 5 steps. Here is how you cook it.

The ingredients needed to make Dal Fry Varan:

  1. {Prepare of tur dal.
  2. {Prepare of tomato chopped.
  3. {Prepare of green chilies chopped.
  4. {Prepare of turmeric powder.
  5. {Take of curry leaves.
  6. {Get of cumin seeds.
  7. {Prepare of rai (mustard seeds).
  8. {Make ready of Salt.
  9. {Take of oil.

Instructions to make Dal Fry Varan:

  1. Wash and clean the tur dal and pour 3 cups of water in the pressure cooker and add pulses. Then close the lid and put the cooker on the medium flame. Turn off the gas after 3 to 4 whistles..
  2. Heat oil in a pan. Add mustard seeds and cumin seeds to curry leaves..
  3. Then add green chillies,Tomato,turmeric powder and salt, cook for 5 minutes on medium flame..
  4. When the flame starts to become red, add boiled toor dal and cook it until it gets a boil..
  5. Now turn off the gas. your dal fry Varan ready. (Garnish the dal with green coriander for decoration. If you want it).

So that is going to wrap this up with this exceptional food dal fry varan recipe. Thank you very much for your time. I am confident you can make this at home. There is gonna be interesting food in home recipes coming up. Remember to save this page in your browser, and share it to your family, friends and colleague. Thank you for reading. Go on get cooking!

Recipe of Favorite Easy no bake caramel apple cheesecake 🍏

Recipe of Favorite Easy no bake caramel apple cheesecake 🍏

Easy no bake caramel apple cheesecake 🍏.

Easy no bake caramel apple cheesecake 🍏

Hey everyone, hope you're having an amazing day today. Today, I will show you a way to prepare a distinctive dish, easy no bake caramel apple cheesecake 🍏. One of my favorites. For mine, I'm gonna make it a bit tasty. This is gonna smell and look delicious.

Easy no bake caramel apple cheesecake 🍏 is one of the most well liked of current trending meals in the world. It's simple, it is fast, it tastes delicious. It is appreciated by millions daily. Easy no bake caramel apple cheesecake 🍏 is something that I've loved my whole life. They're nice and they look fantastic.

To begin with this recipe, we must prepare a few components. You can cook easy no bake caramel apple cheesecake 🍏 using 7 ingredients and 3 steps. Here is how you can achieve that.

The ingredients needed to make Easy no bake caramel apple cheesecake 🍏:

  1. {Take of graham cracker pie crust.
  2. {Make ready of cream cheese softened.
  3. {Make ready of sugar.
  4. {Prepare of cool whip.
  5. {Make ready of lemon juice.
  6. {Prepare of Granny Smith apples.
  7. {Get of Hershey’s caramel ice cream topping.

Instructions to make Easy no bake caramel apple cheesecake 🍏:

  1. Beat the softened cream cheese,sugar and cool whip until smooth and pour into crust. Refrigerate about an hour until firm..
  2. Soak cubes up apples in lemon juice for about 30 minutes to prevent them from turning brown and place on top cheesecake..
  3. Drizzle with caramel sauce and you can top with chopped nuts like peanuts or pecans..

So that's going to wrap this up with this exceptional food easy no bake caramel apple cheesecake 🍏 recipe. Thanks so much for reading. I am confident you will make this at home. There's gonna be more interesting food in home recipes coming up. Remember to bookmark this page in your browser, and share it to your family, colleague and friends. Thanks again for reading. Go on get cooking!

How to Make Any-night-of-the-week Burek or Pie with cheese

How to Make Any-night-of-the-week Burek or Pie with cheese

Burek or Pie with cheese.

Burek or Pie with cheese

Hello everybody, hope you're having an amazing day today. Today, I'm gonna show you how to prepare a distinctive dish, burek or pie with cheese. It is one of my favorites food recipes. For mine, I'm gonna make it a little bit tasty. This is gonna smell and look delicious.

Burek or Pie with cheese is one of the most favored of current trending meals in the world. It is appreciated by millions every day. It's simple, it's fast, it tastes delicious. Burek or Pie with cheese is something which I have loved my entire life. They are fine and they look fantastic.

To get started with this recipe, we have to prepare a few ingredients. You can have burek or pie with cheese using 8 ingredients and 5 steps. Here is how you cook it.

The ingredients needed to make Burek or Pie with cheese:

  1. {Take 500 grams of of different cheeses.
  2. {Take 1/3 of olive oil.
  3. {Take 1 of dill.
  4. {Take 1 of pepper.
  5. {Make ready 1 of salt.
  6. {Prepare 1 tbsp of basil pesto.
  7. {Take 5 slice of fresh pastry.
  8. {Make ready 2 of egg.

Steps to make Burek or Pie with cheese:

  1. Is a recipe that my mum makes after big events f.ex Christmas cause we have a lot of chesses left! so i don't know excactly the portions of the ingridients!.
  2. In a bowl put the cheeses, the pesto, the spices, the egg (maybe you ll need a bit of milk if you don't have a bit of water).
  3. Mix it and the start filling the pastry, roll it and in the end spray some egg to stick it.
  4. roll them and put them in the oven for45min aprx 180degr..
  5. If you like it's nice to mix egg with milk and spray it on the top of the burek before the oven, also spray wit olive oil.

So that is going to wrap this up for this exceptional food burek or pie with cheese recipe. Thank you very much for reading. I'm confident you will make this at home. There's gonna be more interesting food in home recipes coming up. Remember to save this page in your browser, and share it to your loved ones, colleague and friends. Thanks again for reading. Go on get cooking!

Step-by-Step Guide to Make Favorite Classic Alfredo

Step-by-Step Guide to Make Favorite Classic Alfredo

Classic Alfredo.

Classic Alfredo

Hey everyone, hope you're having an incredible day today. Today, I'm gonna show you how to prepare a distinctive dish, classic alfredo. One of my favorites. This time, I'm gonna make it a little bit unique. This will be really delicious.

Classic Alfredo is one of the most favored of recent trending meals on earth. It is simple, it's fast, it tastes yummy. It is enjoyed by millions daily. Classic Alfredo is something that I have loved my entire life. They are fine and they look wonderful.

To get started with this recipe, we must first prepare a few components. You can have classic alfredo using 9 ingredients and 8 steps. Here is how you can achieve that.

The ingredients needed to make Classic Alfredo:

  1. {Make ready of margarine.
  2. {Make ready of cloves of garlic.
  3. {Prepare of all-purpose flour.
  4. {Make ready of skim milk (can use any milk, I prefer skim or almond milk).
  5. {Get of cream cheese (can use light cream cheese if you want).
  6. {Prepare of grated parmesan cheese (save some for the top!).
  7. {Prepare of of whatever pasta you love most! (cooked).
  8. {Get of parsley.
  9. {Get of freshly ground pepper.

Steps to make Classic Alfredo:

  1. Cook pasta according to directions on the box. When cooked, drain and set aside.
  2. In a sauce pan over medium heat, melt margarine.
  3. Add garlic and sauté for about 1 minute or until the garlic is golden and you can smell it.
  4. Stir in flour. Wait a couple of seconds so the flour can combine/cook. Then slowly add in milk, stirring constantly for 8 minutes with a wire whisk until the mixture is thick and bubbly..
  5. Stir in cream cheese and cook for 2 more minutes. Then add most of the parmesan cheese and stir til the cheese is combined.
  6. Add in parsley and pepper, stir.
  7. Pour cheese mixture over the pasta and serve! :) (don't forget to add the extra cheese ontop!).
  8. Optional ingredients: cooked zucchini, broccoli or rosted cherry tomatoes. Just throw them in at the end!.

So that's going to wrap it up for this special food classic alfredo recipe. Thank you very much for reading. I am confident that you can make this at home. There's gonna be interesting food in home recipes coming up. Remember to bookmark this page on your browser, and share it to your loved ones, friends and colleague. Thanks again for reading. Go on get cooking!

Step-by-Step Guide to Make Award-winning Raw Mango Palak Dal Tadka

Step-by-Step Guide to Make Award-winning Raw Mango Palak Dal Tadka

Raw Mango Palak Dal Tadka.

Raw Mango Palak Dal Tadka

Hello everybody, I hope you're having an incredible day today. Today, we're going to prepare a special dish, raw mango palak dal tadka. It is one of my favorites. For mine, I'm gonna make it a bit unique. This will be really delicious.

Raw Mango Palak Dal Tadka is one of the most well liked of recent trending meals in the world. It is enjoyed by millions every day. It is easy, it is fast, it tastes yummy. Raw Mango Palak Dal Tadka is something that I've loved my whole life. They're nice and they look fantastic.

To get started with this particular recipe, we must prepare a few ingredients. You can have raw mango palak dal tadka using 17 ingredients and 6 steps. Here is how you cook it.

The ingredients needed to make Raw Mango Palak Dal Tadka:

  1. {Make ready of Split Toor Dal.
  2. {Get of Chana dal.
  3. {Prepare of raw mango (peeled and chopped).
  4. {Prepare of Palak / spinach(cleaned and chopped).
  5. {Get of Turmeric powder (Haldi).
  6. {Prepare of Red chilli powder.
  7. {Get of garam masala powder.
  8. {Get of Tomato, chopped.
  9. {Prepare of Green Chillies, Slit.
  10. {Make ready of Curry leaves.
  11. {Make ready of Salt.
  12. {Take of Onion, chopped.
  13. {Make ready of Dry red chillies.
  14. {Get of ginger-garlic paste.
  15. {Make ready of Ghee, for tadka.
  16. {Prepare of each mustard seeds, jeera, dhania seeds, methi.
  17. {Take of asafoetida.

Steps to make Raw Mango Palak Dal Tadka:

  1. In the pressure cooker, add both the dals, slit green chillies, turmeric powder, tomato and chopped raw mango and palak. Add 2.5 cups of water and pressure cook. After the first whistle simmer it and cook for 3 to 4 whistles. The Dal should be done..
  2. Let it cool and allow the pressure to release naturally. Open the cooker and use a wooden ladle or rasam spoon to mash the Dal well. Keep it aside..
  3. Heat 1tsp ghee in a pan and add whole red chillies into it. Add the diced onions and cook them till they become translucent in colour..
  4. Once onions are ready then add ginger-garlic paste and saute them for at least 1 minute..
  5. Add the cooked Raw Mango Dal into the pan and let it cook for 5-7 minutes. Add more water if you feel that dal has become too thick. Add salt, garam masala and chilli powder as per your taste. Transfer the Dal to a serving bowl. Garnish with chopped coriander and Kasuri methi..
  6. Heat remaining 1tsp ghee in a pan and add mustard seeds, jeera, dhania seeds, methi, curry leaves and asafoetida. Add this tadka on the Dal..

So that's going to wrap it up with this special food raw mango palak dal tadka recipe. Thank you very much for your time. I am confident that you will make this at home. There's gonna be interesting food in home recipes coming up. Don't forget to bookmark this page in your browser, and share it to your loved ones, colleague and friends. Thank you for reading. Go on get cooking!

Step-by-Step Guide to Prepare Homemade Sultan Sausage/Spinach
Tortellini Bake -halal friendly

Step-by-Step Guide to Prepare Homemade Sultan Sausage/Spinach Tortellini Bake -halal friendly

Sultan Sausage/Spinach Tortellini Bake -halal friendly.

Sultan Sausage/Spinach Tortellini Bake -halal friendly

Hello everybody, it is me again, Dan, welcome to our recipe site. Today, I will show you a way to make a special dish, sultan sausage/spinach tortellini bake -halal friendly. One of my favorites. For mine, I will make it a bit tasty. This is gonna smell and look delicious.

Sultan Sausage/Spinach Tortellini Bake -halal friendly is one of the most favored of recent trending foods on earth. It is simple, it's fast, it tastes yummy. It's enjoyed by millions daily. Sultan Sausage/Spinach Tortellini Bake -halal friendly is something which I've loved my entire life. They're nice and they look fantastic.

To begin with this recipe, we must prepare a few ingredients. You can cook sultan sausage/spinach tortellini bake -halal friendly using 9 ingredients and 8 steps. Here is how you can achieve that.

The ingredients needed to make Sultan Sausage/Spinach Tortellini Bake -halal friendly:

  1. {Prepare 1 tbsp of Butter.
  2. {Take 3 of Long stem onions/chopped.
  3. {Prepare 1/2 cup of Fresh coarsely Chopped Mushrooms.
  4. {Prepare 1/4 cup of sliced/pitted black olives.
  5. {Prepare 1 cup of Chopped sausage (we use Turkish brand/Halal mild Sucuk dried beef sausage).
  6. {Take 1 can of sundried diced tomatoes (we like hunts rosemary & oregano).
  7. {Take 1 packages of Spinach Tortellini (usually find several brands in the packaged deli dept if supermarket).
  8. {Prepare 1/2 cup of sun dried tomato pesto sauce (we used classico brand).
  9. {Take 1 of shredded parmesan cheese & mozzarella.

Steps to make Sultan Sausage/Spinach Tortellini Bake -halal friendly:

  1. Allow pan to melt butter on medium.
  2. Chop and add onion, mushroom, olives, sausage..
  3. Drain tomatoes, add to pan.
  4. Turn up heat, flipping occasionally until excess liquid is cooked into mixture.
  5. While pan mixture is cooking off liquid, boil pasta per directions on package..
  6. Drain pasta and transfer to pan mixture. -adding in pesto. *we turn off the heat, but mix in the pan. Helps to blend elements..
  7. Transfer to baking dish (top with parmesan and mozzarella *optional*) & bake for 20min @ 375°..
  8. We usually plate & serve with Sultan Baguette pizza & garnish with Mezzetta Golden Pepperoncini..

So that's going to wrap this up for this special food sultan sausage/spinach tortellini bake -halal friendly recipe. Thank you very much for reading. I'm sure that you can make this at home. There's gonna be more interesting food in home recipes coming up. Don't forget to bookmark this page in your browser, and share it to your loved ones, friends and colleague. Thank you for reading. Go on get cooking!

Easiest Way to Make Quick ACHARI MATHRI (FRIED PICKLED INDIAN FLAT
BREAD)

Easiest Way to Make Quick ACHARI MATHRI (FRIED PICKLED INDIAN FLAT BREAD)

ACHARI MATHRI (FRIED PICKLED INDIAN FLAT BREAD).

ACHARI MATHRI (FRIED PICKLED INDIAN FLAT BREAD)

Hello everybody, it is John, welcome to my recipe site. Today, I'm gonna show you how to make a distinctive dish, achari mathri (fried pickled indian flat bread). One of my favorites food recipes. For mine, I'm gonna make it a little bit unique. This is gonna smell and look delicious.

ACHARI MATHRI (FRIED PICKLED INDIAN FLAT BREAD) is one of the most popular of current trending foods in the world. It's appreciated by millions every day. It's simple, it's quick, it tastes delicious. ACHARI MATHRI (FRIED PICKLED INDIAN FLAT BREAD) is something which I have loved my whole life. They're fine and they look fantastic.

To begin with this recipe, we have to first prepare a few ingredients. You can have achari mathri (fried pickled indian flat bread) using 6 ingredients and 3 steps. Here is how you can achieve that.

The ingredients needed to make ACHARI MATHRI (FRIED PICKLED INDIAN FLAT BREAD):

  1. {Take 2 cup of wheat flour.
  2. {Take 2 tbsp of oil.
  3. {Take 1 tsp of turmeric powder.
  4. {Take 2 tbsp of aachar masala.
  5. {Take To taste of Salt.
  6. {Get As needed of Oil for frying.

Instructions to make ACHARI MATHRI (FRIED PICKLED INDIAN FLAT BREAD):

  1. Mix all Ingredients & knead medium hard dough..
  2. Divide dough in equal parts. Roll out a small puri like matharis. Prick with fork. Deep fry it on medium flame from both sides till it becomes crispy..
  3. Let it cool & store it in air tight container..

So that's going to wrap it up for this exceptional food achari mathri (fried pickled indian flat bread) recipe. Thanks so much for your time. I'm confident that you will make this at home. There is gonna be more interesting food in home recipes coming up. Don't forget to save this page in your browser, and share it to your loved ones, friends and colleague. Thank you for reading. Go on get cooking!

How to Make Speedy Simple Crispy fried
chicken #4weekschallenge #charityrecipe

How to Make Speedy Simple Crispy fried chicken #4weekschallenge #charityrecipe

Simple Crispy fried chicken #4weekschallenge #charityrecipe.

Simple Crispy fried chicken #4weekschallenge #charityrecipe

Hey everyone, I hope you're having an incredible day today. Today, we're going to make a distinctive dish, simple crispy fried chicken #4weekschallenge #charityrecipe. One of my favorites food recipes. This time, I am going to make it a little bit tasty. This will be really delicious.

Simple Crispy fried chicken #4weekschallenge #charityrecipe is one of the most favored of current trending meals on earth. It's enjoyed by millions daily. It's easy, it is fast, it tastes yummy. Simple Crispy fried chicken #4weekschallenge #charityrecipe is something which I have loved my whole life. They're fine and they look wonderful.

To begin with this particular recipe, we must first prepare a few components. You can have simple crispy fried chicken #4weekschallenge #charityrecipe using 7 ingredients and 3 steps. Here is how you cook that.

The ingredients needed to make Simple Crispy fried chicken #4weekschallenge #charityrecipe:

  1. {Take of chicken.
  2. {Get of Royco.
  3. {Take of Salt.
  4. {Make ready of Curry powder.
  5. {Take of Lemon and herb spice.
  6. {Prepare of Soy sauce.
  7. {Prepare of Oil.

Steps to make Simple Crispy fried chicken #4weekschallenge #charityrecipe:

  1. Marinade the chicken with all the above spices.
  2. Fry the chicken.
  3. You can stop there, still delicious or make it a wet fry by adding tomatoes and onions.. Enjoy!.

So that's going to wrap it up with this special food simple crispy fried chicken #4weekschallenge #charityrecipe recipe. Thank you very much for reading. I'm sure you will make this at home. There is gonna be interesting food at home recipes coming up. Don't forget to save this page on your browser, and share it to your loved ones, friends and colleague. Thanks again for reading. Go on get cooking!

Recipe of Ultimate Simple homemade and decorated eggless vanilla cake

Recipe of Ultimate Simple homemade and decorated eggless vanilla cake

Simple homemade and decorated eggless vanilla cake.

Simple homemade and decorated eggless vanilla cake

Hey everyone, I hope you are having an amazing day today. Today, I will show you a way to prepare a distinctive dish, simple homemade and decorated eggless vanilla cake. One of my favorites food recipes. For mine, I will make it a little bit tasty. This is gonna smell and look delicious.

Simple homemade and decorated eggless vanilla cake is one of the most well liked of current trending foods in the world. It's enjoyed by millions daily. It is easy, it's quick, it tastes delicious. Simple homemade and decorated eggless vanilla cake is something which I have loved my entire life. They're nice and they look fantastic.

To get started with this recipe, we must prepare a few components. You can have simple homemade and decorated eggless vanilla cake using 5 ingredients and 11 steps. Here is how you cook that.

The ingredients needed to make Simple homemade and decorated eggless vanilla cake:

  1. {Prepare 1 of Round Sponge cake.
  2. {Get 1 cup of Whipped cream.
  3. {Take bag of Piping.
  4. {Make ready as required of Nozzal as shown in pic.
  5. {Prepare 1 Glass of water with sugar dissolved in it.

Instructions to make Simple homemade and decorated eggless vanilla cake:

  1. Take a sponge cake,I have taken homemade vanilla sponge cake bread.
  2. Cut it into three part as shown in pic.
  3. Take dairy / non dairy whipping cream in a bowl add little bit of vanilla essence and whip it till soft peak formed.
  4. Now place one sponge,apply sugar water syrup on sponge cake with help of brush or spoon and place whipp cream on it.
  5. Spread the whip cream with help of spoon on the sponge and cover sides of cake also in same way repeat the process till all three sponge layers formed,in between each layer of sponge one should apply sugar syrup and then whipped cream.
  6. After the cake is covered with whipp cream from all sides use the scrapper to form the outer design.
  7. Tip :for beginner it is difficult to get sharp edge so it’s better to use scrapper as it gives design and cover up the flaws.
  8. Now in piping pig place the nozzal for making rose.
  9. Make rose,as a beginner you won’t have rose nail do use glass for making rose.
  10. Now by use of scissors take rose and place it on cake,star nozzal can be used to make edge design or even the rose nozzal can be used to make outer design.
  11. The cake decoration done,let it set in fridge for some time.

So that is going to wrap it up with this exceptional food simple homemade and decorated eggless vanilla cake recipe. Thank you very much for reading. I'm sure that you will make this at home. There is gonna be more interesting food at home recipes coming up. Remember to save this page in your browser, and share it to your loved ones, colleague and friends. Thank you for reading. Go on get cooking!

Steps to Make Quick Iyengar bakery khara (spicy bread)

Steps to Make Quick Iyengar bakery khara (spicy bread)

Iyengar bakery khara (spicy bread).

Iyengar bakery khara (spicy bread)

Hey everyone, it's Drew, welcome to my recipe page. Today, I will show you a way to make a distinctive dish, iyengar bakery khara (spicy bread). It is one of my favorites food recipes. For mine, I am going to make it a bit tasty. This is gonna smell and look delicious.

Iyengar bakery khara (spicy bread) is one of the most popular of current trending meals on earth. It's enjoyed by millions every day. It's easy, it is quick, it tastes yummy. Iyengar bakery khara (spicy bread) is something which I've loved my entire life. They are nice and they look wonderful.

To begin with this recipe, we have to first prepare a few ingredients. You can cook iyengar bakery khara (spicy bread) using 15 ingredients and 4 steps. Here is how you cook that.

The ingredients needed to make Iyengar bakery khara (spicy bread):

  1. {Prepare 1 tablespoon of sugar.
  2. {Get 2 teaspoon of salt.
  3. {Get 3.5 cups of all purpose flour.
  4. {Make ready 2 tsp of yeast.
  5. {Get 1/4 cup of oil.
  6. {Take 1/2 cup of milk.
  7. {Take 1/4 cup of water.
  8. {Make ready of For the masala.
  9. {Make ready 1 of big onion finely chopped.
  10. {Make ready 1 of tspn jeera.
  11. {Make ready 1 of tspn turmeric.
  12. {Get 1/2 cup of cilantro finely chopped.
  13. {Prepare 10 of curry leaves.
  14. {Get 1 inch of ginger grated.
  15. {Make ready 4 of green chilies finely chooped.

Steps to make Iyengar bakery khara (spicy bread):

  1. .
  2. .
  3. .
  4. .

So that is going to wrap it up for this special food iyengar bakery khara (spicy bread) recipe. Thank you very much for your time. I am confident that you will make this at home. There's gonna be more interesting food at home recipes coming up. Don't forget to bookmark this page in your browser, and share it to your family, friends and colleague. Thank you for reading. Go on get cooking!

Easiest Way to Prepare Homemade Baked bow-tie pasta salad

Easiest Way to Prepare Homemade Baked bow-tie pasta salad

Baked bow-tie pasta salad.

Baked bow-tie pasta salad

Hey everyone, I hope you are having an incredible day today. Today, we're going to make a special dish, baked bow-tie pasta salad. One of my favorites. This time, I am going to make it a bit unique. This is gonna smell and look delicious.

Baked bow-tie pasta salad is one of the most popular of recent trending meals in the world. It's enjoyed by millions daily. It is simple, it's fast, it tastes delicious. They are nice and they look wonderful. Baked bow-tie pasta salad is something which I have loved my whole life.

To get started with this particular recipe, we must first prepare a few components. You can have baked bow-tie pasta salad using 11 ingredients and 4 steps. Here is how you cook it.

The ingredients needed to make Baked bow-tie pasta salad:

  1. {Prepare of bow tie pasta.
  2. {Make ready of grilled chicken tenders.
  3. {Take of broccoli florets.
  4. {Get of onion (neatly chopped).
  5. {Make ready of baby spinach.
  6. {Prepare of sweet corn kernels.
  7. {Get of shredded cheese of any choice (I used colby jack).
  8. {Get of alfredo sauce.
  9. {Get of crushed peppercorns.
  10. {Take of sea-salt.
  11. {Make ready of butter.

Steps to make Baked bow-tie pasta salad:

  1. Boil the pasta and drain well to keep aside.Pour oil over so that it doesn’t stick..
  2. Shallow fry the onions, broccoli and chicken with salt and peppercorns.Add in the sweet corn, spinach and alfredo sauce. Mix well..
  3. For layering the casserole: Brush with melted butter and evenly spread the chicken mix over it, next spread the pasta uniformly on top. Layer with the cheese evenly and spread salt and peppercorns over it..
  4. Bake at about 350 deg Fahrenheit for 15 min..

So that is going to wrap this up for this special food baked bow-tie pasta salad recipe. Thanks so much for your time. I'm confident you can make this at home. There is gonna be more interesting food at home recipes coming up. Remember to bookmark this page on your browser, and share it to your loved ones, friends and colleague. Thank you for reading. Go on get cooking!

Recipe of Any-night-of-the-week Khao Man Gai sauce (ข้าวมันไก่)

Recipe of Any-night-of-the-week Khao Man Gai sauce (ข้าวมันไก่)

Khao Man Gai sauce (ข้าวมันไก่).

Khao Man Gai sauce (ข้าวมันไก่)

Hey everyone, hope you are having an incredible day today. Today, I'm gonna show you how to prepare a distinctive dish, khao man gai sauce (ข้าวมันไก่). It is one of my favorites. For mine, I will make it a bit unique. This is gonna smell and look delicious.

Khao Man Gai sauce (ข้าวมันไก่) is one of the most popular of current trending foods in the world. It is easy, it's fast, it tastes delicious. It is appreciated by millions every day. They are nice and they look wonderful. Khao Man Gai sauce (ข้าวมันไก่) is something that I have loved my whole life.

To begin with this recipe, we must prepare a few components. You can cook khao man gai sauce (ข้าวมันไก่) using 7 ingredients and 2 steps. Here is how you cook it.

The ingredients needed to make Khao Man Gai sauce (ข้าวมันไก่):

  1. {Prepare 5 of thai chillies.
  2. {Prepare 3 cloves of garlic.
  3. {Make ready of Ginger (1 knob, optional).
  4. {Make ready 1-2 tbs of Pickled garlic juice or Pak Gard Dong ผักกาดดอง juice.
  5. {Take of Tao-jiao (thai fermented soybean paste) to taste.
  6. {Take of Lemon juice to taste.
  7. {Make ready of Fish sauce to taste.

Instructions to make Khao Man Gai sauce (ข้าวมันไก่):

  1. Add all ingredients to a blender or food processor and process until smooth..
  2. All of the ingredients are basically thrown together to taste. Add more or less of any of them to suit your preferences..

So that's going to wrap it up for this exceptional food khao man gai sauce (ข้าวมันไก่) recipe. Thanks so much for reading. I'm sure you will make this at home. There is gonna be interesting food at home recipes coming up. Remember to bookmark this page in your browser, and share it to your family, friends and colleague. Thank you for reading. Go on get cooking!

Recipe of Perfect No-Bake! Chocolate Cheesecake

Recipe of Perfect No-Bake! Chocolate Cheesecake

No-Bake! Chocolate Cheesecake.

No-Bake! Chocolate Cheesecake

Hello everybody, it's Jim, welcome to our recipe page. Today, we're going to make a distinctive dish, no-bake! chocolate cheesecake. It is one of my favorites. For mine, I'm gonna make it a little bit unique. This will be really delicious.

No-Bake! Chocolate Cheesecake is one of the most well liked of current trending meals on earth. It is simple, it is quick, it tastes delicious. It is appreciated by millions every day. They're fine and they look wonderful. No-Bake! Chocolate Cheesecake is something that I have loved my whole life.

To get started with this recipe, we have to prepare a few components. You can cook no-bake! chocolate cheesecake using 23 ingredients and 26 steps. Here is how you cook it.

The ingredients needed to make No-Bake! Chocolate Cheesecake:

  1. {Make ready of Crust.
  2. {Prepare 90 g (3.2 oz) of biscuits.
  3. {Prepare 60 g of (2.1 oz, 5 Tbsp) unsalted butter.
  4. {Get of Filling, Chocolate Cheesecake.
  5. {Take 150 g (5.3 oz) of cream cheese, room temperature.
  6. {Take 200 g of (7 oz, 7/8 us cup) heavy cream.
  7. {Take 150 g (5.3 oz) of couverture chocolate.
  8. {Prepare 5-6 drops of vanilla essence, optional.
  9. {Make ready 1 of egg yolk.
  10. {Get 4 tsp of granulated sugar, for egg yolk.
  11. {Prepare 2 tsp of cake flour.
  12. {Prepare 75 g of (2.6 oz, 5 Tbsp) milk.
  13. {Prepare 1 of egg white.
  14. {Get 2.5 Tbsp of granulated sugar, for egg white.
  15. {Get of Topping (cocoa cream).
  16. {Make ready 200 g of (7 oz, 7/8 us cup) heavy cream.
  17. {Make ready 1.5 Tbsp of granulated sugar.
  18. {Get 2 Tbsp of cocoa powder, sugar-free.
  19. {Make ready 5-6 drops of vanilla essence, optional.
  20. {Get 1 tsp of rum, optional.
  21. {Prepare of cocoa powder for dusting.
  22. {Prepare of ※The cocoa cream was around double the required amount.
  23. {Take of ※I used couverture chocolate, but you can use normal chocolate (ex. chocolate chips).

Instructions to make No-Bake! Chocolate Cheesecake:

  1. ★Recipe video★ (my You Tube channel)→youtu.be/qTpDD0rgbMw.
  2. 【For the crust】 I use a round cake pan with a removable bottom. Grease the bottom of the pan with unsalted butter. Line the bottom of the pan with the parchment paper..
  3. Crush biscuits until very fine crumbs form. Melt unsalted butter with microwave, at 600W for 30-40 sec. Add the melted butter to the biscuit crumbs and mix until well combined..
  4. Press the crumbs into the bottom of the cake pan. Let it sit in a fridge..
  5. 【For the filling】 (Leave the cream cheese at room temperature to soften beforehand.) Whip heavy cream while cooling with ice water until heavy. Add vanilla essence. Whip it until soft peaks form. Let it sit in a fridge..
  6. Put the chocolate in a bowl. Pour water into a small pot. Bring the water to a boil and then turn off the heat. Put the bowl with chocolate on the top of the pot so as not to touch the hot water directly..
  7. Wait for 30 sec and then melt the chocolate until smooth. Takedown the pot and bowl as it is, and set aside..
  8. Separate an egg yolk from an egg white. Put the egg white in a large bowl; set aside. Make the custard. Add 4 tsp granulated sugar to the egg yolk. Mix it with a whisk for 1.5 mins until it turns pale yellow..
  9. Sift cake flour into the mixture with a tea strainer. Mix lightly until combined. Pour the milk into the mixture while stirring. Mix well..
  10. Microwave the mixture several times until heavy and creamy, mix well each time. 1st time 500W 1 min, Mix, 2nd time 500W 30 sec, Mix, 3rd time 500W 20 sec, Mix, 4th time 500W 20 sec, Mix. The custard is ready..
  11. Add 1/4 of the melted chocolate to the custard. Mix well until well combined and glossy..
  12. Put it back in the bowl of chocolate. Mix well with a whisk for 1.5 mins until smooth and glossy. Set aside..
  13. (Make the meringue.) Boil water in a frying pan. Beat the egg white lightly, and add 2.5 Tbsp granulated sugar. Mix roughly, and then put the bowl into the hot water..
  14. Warm it while stirring over low heat until it reaches 50 ℃ / 122 F. Takedown the bowl, and immediately whip it on high speed..
  15. Whip it until soft peaks form. The meringue is ready. Set aside..
  16. Mix well the cream cheese until soft and smooth. Fold half of the chocolate cream into the cream cheese with a spatula. Mix it with a whisk until smooth..
  17. Add the other half. Mix it for 3 mins until whitish and glossy..
  18. Take the whipped heavy cream out from the fridge. Add it in 3 parts. Mix it with a whisk until well combined at 1st addition..
  19. At the 2nd addition, use a spatula to fold the cream 15 times into the filling. At the 3rd addition, fold until combined..
  20. Add the meringue in 2parts, and fold each addition until combined. Put the filling in the prepared cake pan. Flatten the top roughly. Refrigerate it for 6 hours to set..
  21. 【For the cocoa cream】 Whip heavy cream and granulated sugar on low speed while cooling with ice water, until thickened lightly. Sift 1 Tbsp cocoa powder over the cream with a tea strainer..
  22. Mix roughly until the powderiness disappears. Whip it on low speed until heavy. Sift another 1 Tbsp cocoa over..
  23. Mix roughly until the powderiness disappears. Whip it until peaks form..
  24. Add vanilla essence and rum. Fold them into the cream..
  25. Take the cake pan out from the fridge. Warm the side of the pan with a hot towel. Remove the cake from the pan gently..
  26. Pipe swirls of the cocoa cream over the top of the cake. Dust with cocoa powder. Done!.

So that is going to wrap this up with this special food no-bake! chocolate cheesecake recipe. Thanks so much for reading. I am confident you will make this at home. There is gonna be more interesting food at home recipes coming up. Remember to save this page in your browser, and share it to your family, friends and colleague. Thank you for reading. Go on get cooking!

Simple Way to Make Homemade Mike's Chinese Hot And Sour Soup

Simple Way to Make Homemade Mike's Chinese Hot And Sour Soup

Mike's Chinese Hot And Sour Soup.

Mike's Chinese Hot And Sour Soup

Hello everybody, it is me again, Dan, welcome to our recipe page. Today, I'm gonna show you how to make a special dish, mike's chinese hot and sour soup. It is one of my favorites food recipes. This time, I will make it a little bit unique. This is gonna smell and look delicious.

Mike's Chinese Hot And Sour Soup is one of the most popular of current trending meals on earth. It's appreciated by millions every day. It is easy, it's quick, it tastes yummy. Mike's Chinese Hot And Sour Soup is something that I have loved my entire life. They're fine and they look wonderful.

To begin with this recipe, we have to prepare a few ingredients. You can have mike's chinese hot and sour soup using 27 ingredients and 7 steps. Here is how you can achieve it.

The ingredients needed to make Mike's Chinese Hot And Sour Soup:

  1. {Get of ● For The Hot & Sour Soup.
  2. {Take 5 Cups of Chicken Or Beef Stock.
  3. {Take 1 1/2 Cups of Precooked Shreaded Chicken, Beef Or Pork [packed].
  4. {Get 1/4 Cup of Bamboo Shoots [drained - thin sliced].
  5. {Prepare 1/4 Cup of Water Chestnuts [drained - minced].
  6. {Take 1/4 Cup of Shiitake Mushrooms [small chop - or, white & brown].
  7. {Get 6 oz of Firm Tofu [1/2" chop].
  8. {Take 2 tsp of Fine Minced Fresh Ginger.
  9. {Make ready 1 of [or 2 - your call] LG Eggs [beaten].
  10. {Prepare 2 tbsp of Rice Wine Vinegar.
  11. {Make ready 1 1/2 tbsp of Sriracha Chile Sauce.
  12. {Make ready 3 tbsp of Soy Sauce.
  13. {Prepare 1 tbsp of Brown Sugar.
  14. {Make ready 1 tsp of Sesame Seed Oil.
  15. {Take 1/4 tsp of Chinese 5 Spice.
  16. {Prepare 1/2 tsp of Red Pepper Flakes.
  17. {Prepare of ● For The Thickener.
  18. {Prepare 2 tbsp of Corn Starch + 2 tbs Water [more if you want her more viscous].
  19. {Make ready of ● For The Sides & Garnishments.
  20. {Get as needed of Fresh Chives [minced].
  21. {Prepare as needed of Fresh Cilantro Leaves.
  22. {Take as needed of Thai Chilies [fine minced - optional].
  23. {Get as needed of Crispy Chow Mein Noodles.
  24. {Make ready as needed of Soy Sauce.
  25. {Make ready as needed of Chile Sauce.
  26. {Take of ● For The Options.
  27. {Get 1/8 Cup of Dried Roasted Nori [aka dried seaweed - rough chopped].

Steps to make Mike's Chinese Hot And Sour Soup:

  1. Chop your veggies. Heat everything in the Hot & Sour Soup section for 20 minutes. Stir regularly. At 20 minutes in, add your whisked egg[s] and stir constantly until eggs are fully cooked. Then, while soup is at a steady simmer, add your corn starch and water mixture slowly. She'll thicken up quickly as she bubbles away. Add more corn starch and water if you'd like her a bit thicker. ● P.S., this is the actual color of soup below. The kiddos somehow ended up taking darker faced photos upon down lighting with the other pictures..
  2. Brown, white, oyster or Shiitake mushrooms really do make this dish! Your choice! Just dice!.
  3. For The Sides & Garnishments. Thai Chilies, fresh Cilantro leaves and chopped Chives..
  4. Dried Roasted Nori. To taste. Definitely consider this addition!.
  5. Fresh crunchy Chow Mein Noodles are always a must atop this flavorful dish!.
  6. Top view..
  7. Serve Hot & Sour Soup with the fresh garnishments listed. Especially the fresh Cilantro. It really does make the dish! Serve soup piping hot with fresh, crunchy Chow Mein Noodles and Soy Sauce. Enjoy!.

So that is going to wrap this up with this special food mike's chinese hot and sour soup recipe. Thank you very much for your time. I'm sure you can make this at home. There is gonna be interesting food at home recipes coming up. Don't forget to save this page on your browser, and share it to your family, colleague and friends. Thanks again for reading. Go on get cooking!

Easiest Way to Prepare Perfect Alo chicken kabab

Easiest Way to Prepare Perfect Alo chicken kabab

Alo chicken kabab.

Alo chicken kabab

Hello everybody, it is Drew, welcome to my recipe site. Today, I will show you a way to prepare a special dish, alo chicken kabab. One of my favorites. This time, I'm gonna make it a bit tasty. This is gonna smell and look delicious.

Alo chicken kabab is one of the most favored of recent trending foods on earth. It's easy, it is quick, it tastes delicious. It is enjoyed by millions every day. Alo chicken kabab is something that I have loved my entire life. They're fine and they look fantastic.

To get started with this recipe, we have to first prepare a few components. You can have alo chicken kabab using 8 ingredients and 4 steps. Here is how you cook it.

The ingredients needed to make Alo chicken kabab:

  1. {Get of Potato 3 boil.
  2. {Get of Chicken boil and shredded.
  3. {Prepare of Cheese.
  4. {Prepare 5-6 of Green chillies.
  5. {Get 2 tsp of Coriander seeds.
  6. {Make ready 2 tsp of Zeera.
  7. {Get 1 tsp of Red chilli.
  8. {Make ready 1 tsp of Ground spices.

Steps to make Alo chicken kabab:

  1. Boil chicken and potatoes..
  2. Mashed potatoes add shredded chicken, green chillies, red chilli, Zeera, coriander seeds,salt, ground spices and shredded cheese..
  3. Mix them well.make a cutlets..
  4. Fry them with both sides.serve with chutney or raita.

So that is going to wrap it up for this special food alo chicken kabab recipe. Thank you very much for reading. I'm sure you can make this at home. There's gonna be more interesting food at home recipes coming up. Don't forget to bookmark this page in your browser, and share it to your family, colleague and friends. Thanks again for reading. Go on get cooking!

How to Prepare Speedy Sausage Alfredo

How to Prepare Speedy Sausage Alfredo

Sausage Alfredo.

Sausage Alfredo

Hey everyone, it's Jim, welcome to my recipe page. Today, we're going to prepare a distinctive dish, sausage alfredo. It is one of my favorites food recipes. For mine, I am going to make it a bit unique. This will be really delicious.

Sausage Alfredo is one of the most well liked of current trending foods in the world. It's easy, it's fast, it tastes yummy. It's enjoyed by millions daily. They are fine and they look fantastic. Sausage Alfredo is something which I have loved my whole life.

To begin with this recipe, we must prepare a few components. You can cook sausage alfredo using 6 ingredients and 4 steps. Here is how you can achieve it.

The ingredients needed to make Sausage Alfredo:

  1. {Make ready of pasta; cooked and drained.
  2. {Get of smoked sausage.
  3. {Make ready of cajun seasoning.
  4. {Make ready of heavy cream.
  5. {Take of grated parmesan cheese.
  6. {Get of peas and diced onion (optional).

Instructions to make Sausage Alfredo:

  1. Boil noodles as directed on box. Drain and set aside. Add peas and onions during last few minutes of boiling (optional)..
  2. Cut sausage into 1/4 inch slices and brown for about 5 minutes..
  3. Add heavy cream and seasoning. Bring to a boil. Then simmer for 3-4 minutes until thickened..
  4. Remove from heat and add Parmesan cheese. Stir. Add cooked noodles..

So that's going to wrap this up for this special food sausage alfredo recipe. Thanks so much for your time. I'm sure that you can make this at home. There is gonna be more interesting food in home recipes coming up. Don't forget to bookmark this page on your browser, and share it to your loved ones, friends and colleague. Thanks again for reading. Go on get cooking!

Easiest Way to Make Any-night-of-the-week Cucumber Turkey Sandwich

Easiest Way to Make Any-night-of-the-week Cucumber Turkey Sandwich

Cucumber Turkey Sandwich.

Cucumber Turkey Sandwich

Hello everybody, hope you are having an amazing day today. Today, I'm gonna show you how to make a special dish, cucumber turkey sandwich. It is one of my favorites food recipes. For mine, I am going to make it a little bit unique. This is gonna smell and look delicious.

Cucumber Turkey Sandwich is one of the most popular of recent trending meals on earth. It's simple, it is quick, it tastes delicious. It is enjoyed by millions daily. They are fine and they look wonderful. Cucumber Turkey Sandwich is something that I have loved my entire life.

To begin with this recipe, we have to prepare a few components. You can have cucumber turkey sandwich using 3 ingredients and 1 steps. Here is how you cook it.

The ingredients needed to make Cucumber Turkey Sandwich:

  1. {Get 1 of Any type of sandiwch meat you like (i.e. Turkey Ham Salami).
  2. {Get 1 of Your favorite sandwich spread (i.e. Ranch Mayo Mustard Oil&Vinegar).
  3. {Prepare 1 of Your favorite type of cheese (Cheddar Swiss Mozzarella Provolone).

Steps to make Cucumber Turkey Sandwich:

  1. Peel your cucumber and slice it to make your "bread". Then add all of your sandwich fixins and enjoy!.

So that's going to wrap this up with this special food cucumber turkey sandwich recipe. Thank you very much for reading. I'm sure you can make this at home. There is gonna be interesting food at home recipes coming up. Remember to save this page in your browser, and share it to your family, friends and colleague. Thanks again for reading. Go on get cooking!

How to Make Perfect Sunflower shaped vada paav Bread

How to Make Perfect Sunflower shaped vada paav Bread

Sunflower shaped vada paav Bread.

Sunflower shaped vada paav Bread

Hey everyone, it's me again, Dan, welcome to my recipe page. Today, I will show you a way to make a special dish, sunflower shaped vada paav bread. It is one of my favorites food recipes. For mine, I will make it a bit tasty. This will be really delicious.

Sunflower shaped vada paav Bread is one of the most favored of recent trending meals on earth. It is appreciated by millions every day. It is simple, it's fast, it tastes delicious. Sunflower shaped vada paav Bread is something which I have loved my entire life. They're fine and they look wonderful.

To get started with this recipe, we have to prepare a few components. You can cook sunflower shaped vada paav bread using 20 ingredients and 14 steps. Here is how you cook it.

The ingredients needed to make Sunflower shaped vada paav Bread:

  1. {Get 2.5 cups of wheat flour.
  2. {Make ready 7 gms of Dry Yeast.
  3. {Make ready 1 tablespoon of Sugar.
  4. {Get 1 teaspoon of Salt.
  5. {Prepare 2 tablespoons of Olive Oil.
  6. {Prepare 1 cup of Water or as required.
  7. {Get For of ALOO MIXTURE:.
  8. {Prepare 2 tsp of Oil.
  9. {Get 1/2 tsp of mustard seeds.
  10. {Prepare pinch of hing.
  11. {Take A few of curry leaves.
  12. {Take 2 cloves of garlic, crushed.
  13. {Get 1 of chilli, finely chopped.
  14. {Take 2 tbsp of coriander, finely chopped.
  15. {Prepare 1/2 tsp of turmeric powder.
  16. {Take 2 of potatoes,boiled & mashed.
  17. {Prepare 1 tsp of salt or as needed.
  18. {Prepare 1 tbsp of lemon juice.
  19. {Prepare As required of Garlic chutney.
  20. {Make ready As needed of Green chutney.

Steps to make Sunflower shaped vada paav Bread:

  1. For aloo filling Take a pan and heat 2 tsp oil and splutter mustard seeds Add a pinch of hing and few curry leaves. Also add garlic, chilli, coriander and saute well. Mow add turmeric powder and stir add boiled and mashed potato and salt too. Mix well making sure all the spices are combined well with potato. Turn off the flame and let the mix cool.
  2. For the dough. Take yeast and sugar in a bowl, add little warm water and mix well. Set aside for 5-7 mins for the yeast to activate..
  3. Now take Flour, salt, 2 tblspn of oil in a large bowl and mix well. Add in the yeast mix in and mix well using a fork. Add little warm water as needed..
  4. Knead this to a soft dough. The dough has to be nonsticky. Drizzle in 1 tblspn of oil and knead well. Cover and set aside to rise for 1 hour..
  5. When the dough gets double in size give some more bunches.
  6. Now divide the dough in three equal parts. And again divide them in two parts each..
  7. Make balls and roll them like chapati. I made 9” chapati from each, so got six chapatis.
  8. Take on chapati on a baking paper apply some garlic chutney. Place little filling in the center..
  9. Now keep filling around the circumference giving a round shape as shown.
  10. Cover it with the other rolled chapati and place a small bowl in the middle. See pic.
  11. With the help of a sharp knife give cuts as shown keeping the center intact.
  12. Now lift and twist each cut. This will look like a sunflower. Sprinkle some dry garli- coconut chutney masala. Put some sesame seeds and kalongi in the middle..
  13. Place the tray in pre heated oven for 20 minutes or till it’s done.
  14. Enjoy hot vada paav stuffed sunflower bread with your dad.

So that's going to wrap this up for this exceptional food sunflower shaped vada paav bread recipe. Thank you very much for your time. I am sure that you will make this at home. There is gonna be more interesting food at home recipes coming up. Don't forget to bookmark this page on your browser, and share it to your family, friends and colleague. Thanks again for reading. Go on get cooking!

How to Make Speedy Soya chucks biryani

How to Make Speedy Soya chucks biryani

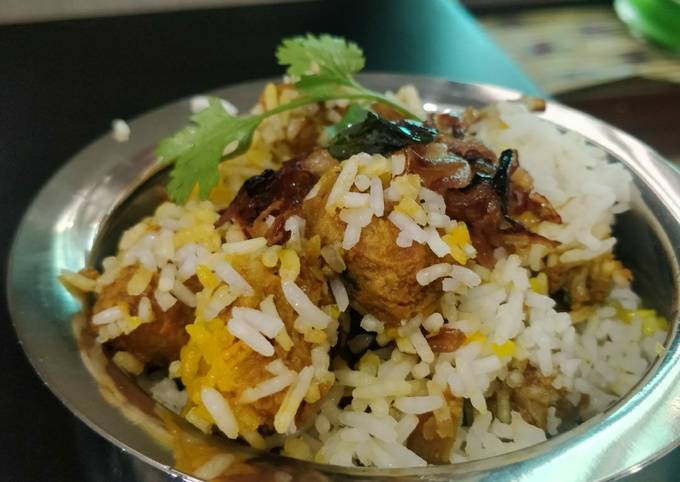
Soya chucks biryani. Soya chunks biryani or meal maker biryani is one of the protein enriched easy biryani that one can make. It can be served without any side dish, however a simple onion raita or a mint raita also goes. How to make soya chunks biryani method.

Soya chucks biryani I am posting the recipe of soya chunks biryani made in pressure cooker, though it is not the authentic way of making biryani, but i am sure it will taste awesome and easy one to make even on a. Soya Chunk Biriyani is a healthy and one pot spicy Indian rice recipe. Soya Chunks, veggies and rice cooked in a aromatic Indian spice masala.

Hello everybody, hope you're having an amazing day today. Today, I will show you a way to make a distinctive dish, soya chucks biryani. One of my favorites. This time, I will make it a little bit tasty. This will be really delicious.

Soya chucks biryani is one of the most popular of recent trending foods on earth. It is appreciated by millions daily. It's simple, it is quick, it tastes delicious. They're fine and they look wonderful. Soya chucks biryani is something which I've loved my entire life.

Soya chunks biryani or meal maker biryani is one of the protein enriched easy biryani that one can make. It can be served without any side dish, however a simple onion raita or a mint raita also goes. How to make soya chunks biryani method.

To get started with this particular recipe, we must prepare a few ingredients. You can cook soya chucks biryani using 20 ingredients and 4 steps. Here is how you cook it.

The ingredients needed to make Soya chucks biryani:

  1. {Prepare 1 cup of soya chunks boiled.
  2. {Prepare 1 cup of rice.
  3. {Prepare 8 pods of Garlic.
  4. {Prepare 1 inch of Ginger.
  5. {Take 3 of onions.
  6. {Prepare 1 tbsp of Cumin seeds.
  7. {Make ready 1 tbsp of Turmeric Powder.
  8. {Prepare 1 tsp of Coriander powder.
  9. {Take 1 tsp of Red chilli powder.
  10. {Get as per taste of Salt.
  11. {Make ready as needed of Oil.
  12. {Make ready 2 of Bay leaf.
  13. {Make ready 2 of ,black cardamom.
  14. {Make ready 1/2 inch of ,cinnamon stich.
  15. {Take 1 of Star annies.
  16. {Prepare 1 inch of ,cinnamon stick.
  17. {Make ready as needed of Yellow food colour.
  18. {Prepare as required of Rose water or kewra water.
  19. {Make ready 2 of Tomatoes chopped.
  20. {Get as required of Curd.

Soya chunks biryani is a healthy protein-rich lunch recipe. Now the Soya Chunks Biryani is ready to serve. Finally, garnish the dish with reserved nuts, raisins, fried onions and coriander leaves. Soya Chunks also know as meal maker is said to lower cholesterol levels, prevents heart diseases, reduces the risk of osteoporosis, controls hypertension, blood pressure, aids in weight loss etc.

Steps to make Soya chucks biryani:

  1. Chop 2 onions and deep fry them golden brown and keep aside.par boil the rice by adding star annies,cinnamon stick,black cardimom and bay leaves to the water and a spoon full of oil and salt.Strain the water and keep aside the rice after done..
  2. Boil the soya chunks.Now Marinate the chunks into mixture of curd,ginger garlic paste,red chilli powder,coriander powder,turmericpowder and garam masala and salt.Now grind 1 onion,garlic and ginger with 1/2 spoon of cumin.Heat the oil in a wok and add bay leaf and the grounded paste and saute till brown..
  3. Once the grounded masala is done add turmericpowder,salt,red chillie powder,coriander powder and garam masala and add chopped tomatoes and saute till tomatoes become tender.Add one chopped onion and saute.when done add marinated soya chunksand let it roast until oil oze out..
  4. Now take a pot arrange one layer of rice at the bottom,then arrange a layer of soya chunks.Again arrange layer of rice and again soya chunks prepared.At the last arrange par boiled rice and on the top place some deep fried brown onion.Add colour in drops on top.Now lastly add kewra eccence or gulab jal.Now dam this biryani for 20 to 30 mnts on a very low flame.Enjoy it with raita..

Soya Chunks & Beetroot Biryani is a South Indian style Biryani recipe which is flavoured with freshly ground coriander powder,coconut milk and other Indian spices. I prepared this soya chunks biryani with a slight variation from my usual vegetable biryani. Those who doesn't like soya chunks can replace it with vegetables. Soya chunks biryani is a very delicious biryani made with soya chunks, vegetables and spices. Basic Ingredients for Soya Chunks Biryani: First, Soya chunks-Soya chunks can be easily.

So that's going to wrap it up with this exceptional food soya chucks biryani recipe. Thank you very much for reading. I am confident you can make this at home. There is gonna be interesting food in home recipes coming up. Remember to save this page on your browser, and share it to your family, colleague and friends. Thank you for reading. Go on get cooking!

Recipe of Homemade Granny's Recipe for Simmered Kabocha

Recipe of Homemade Granny's Recipe for Simmered Kabocha

Granny's Recipe for Simmered Kabocha.

Granny's Recipe for Simmered Kabocha

Hello everybody, it's Brad, welcome to my recipe page. Today, I will show you a way to make a distinctive dish, granny's recipe for simmered kabocha. One of my favorites. This time, I am going to make it a little bit tasty. This is gonna smell and look delicious.

Granny's Recipe for Simmered Kabocha is one of the most favored of current trending foods in the world. It's easy, it's fast, it tastes delicious. It's enjoyed by millions daily. They are fine and they look wonderful. Granny's Recipe for Simmered Kabocha is something that I've loved my whole life.

To begin with this particular recipe, we must prepare a few ingredients. You can cook granny's recipe for simmered kabocha using 6 ingredients and 4 steps. Here is how you can achieve it.

The ingredients needed to make Granny's Recipe for Simmered Kabocha:

  1. {Make ready of Japanese pumpkin (Kabocha).
  2. {Take of Water.
  3. {Get of ● Sugar.
  4. {Prepare of ● Mirin.
  5. {Take of ● Soy sauce.
  6. {Get of ● Dashi stock granules.

Instructions to make Granny's Recipe for Simmered Kabocha:

  1. Dice the kabocha into 3-4cm cubes..
  2. Put water and kabocha in a small pan and boil..
  3. When it comes to a boil, add the ● ingredients. Cover lightly with aluminum foil and simmer for 6 to 7 minutes over medium heat..
  4. Turn the heat off and set it aside for 4 to 5 minutes with the lid still on. The flavor will soak in and make it even more delicious..

So that's going to wrap this up for this special food granny's recipe for simmered kabocha recipe. Thanks so much for your time. I'm confident that you will make this at home. There's gonna be interesting food in home recipes coming up. Remember to bookmark this page in your browser, and share it to your family, friends and colleague. Thank you for reading. Go on get cooking!

Easiest Way to Make Any-night-of-the-week Crispy fried Chicken

Easiest Way to Make Any-night-of-the-week Crispy fried Chicken

Crispy fried Chicken.

Crispy fried Chicken

Hey everyone, it is Jim, welcome to my recipe page. Today, I will show you a way to prepare a distinctive dish, crispy fried chicken. It is one of my favorites. This time, I will make it a little bit tasty. This will be really delicious.

Crispy fried Chicken is one of the most well liked of current trending foods on earth. It is appreciated by millions every day. It's easy, it is quick, it tastes yummy. They're nice and they look wonderful. Crispy fried Chicken is something that I have loved my entire life.

To begin with this particular recipe, we have to first prepare a few components. You can cook crispy fried chicken using 15 ingredients and 4 steps. Here is how you cook that.

The ingredients needed to make Crispy fried Chicken:

  1. {Prepare of Chicken pieces with skin 500 g.
  2. {Get of Salt.
  3. {Get of Soya sauce.
  4. {Make ready of Tomato ketchup.
  5. {Get of Ginger paste.
  6. {Get of Garlic paste.
  7. {Prepare of Black pepper.
  8. {Get of Instant noodles masala 1 pack(optional).
  9. {Get of For coating.
  10. {Take of All purpose flour1.5.
  11. {Take of Garlic powder.
  12. {Get of Corn flour.
  13. {Make ready of Salt.
  14. {Get of Chilli powder.
  15. {Prepare of Turmeric (haldi)powder1/4.

Steps to make Crispy fried Chicken:

  1. Ek bowl main chicken daal kar sary ingredients mix kar ke 2 ghnty ke liye marinate karny ke liye rakh dyn.
  2. Ab coating ke liye jo ingredients btayi hyn wo sb mix kar lyn.
  3. Chicken marinate hony ke baad ek ek piece phly coating waly mixture myn dalyn or achy sy us ke uper lagadyn phir usko pani myn dal dyn phr wahan sy nikal kar dobara coating waly mixture myn dal dyn or phir deep fry kar lyn.
  4. Aisy hi saary pieces ki coating krty jayen or fry krty jayen yummy crispy fried chicken ready hai😋🍗.

So that's going to wrap this up with this special food crispy fried chicken recipe. Thank you very much for your time. I am sure that you will make this at home. There is gonna be more interesting food at home recipes coming up. Remember to save this page in your browser, and share it to your family, colleague and friends. Thank you for reading. Go on get cooking!

Easiest Way to Make Super Quick Homemade Nutella Omelette

Easiest Way to Make Super Quick Homemade Nutella Omelette

Nutella Omelette.

Nutella Omelette

Hey everyone, I hope you're having an amazing day today. Today, I'm gonna show you how to prepare a distinctive dish, nutella omelette. One of my favorites food recipes. This time, I will make it a little bit tasty. This is gonna smell and look delicious.

Nutella Omelette is one of the most favored of current trending meals in the world. It's enjoyed by millions every day. It's easy, it's quick, it tastes yummy. Nutella Omelette is something which I have loved my entire life. They are fine and they look wonderful.

To get started with this recipe, we must first prepare a few ingredients. You can have nutella omelette using 6 ingredients and 4 steps. Here is how you cook that.

The ingredients needed to make Nutella Omelette:

  1. {Take of Egg whites.
  2. {Make ready of Cocoa powder.
  3. {Get of Nutella.
  4. {Prepare of Milk.
  5. {Get of Double/heavy cream.
  6. {Make ready of Vanilla extract.

Instructions to make Nutella Omelette:

  1. Separate the eggs. Place egg whites in a bowl.
  2. Add all of the other ingredients into the bowl and whisk..
  3. Pour mixture into an omelette/crepe pan and cook at a medium temperature for roughly 3 minutes.
  4. Flip the omelette and cook the other side for 3 minutes or until there is no more liquid.

So that is going to wrap it up for this special food nutella omelette recipe. Thank you very much for reading. I am confident you can make this at home. There's gonna be more interesting food in home recipes coming up. Don't forget to save this page on your browser, and share it to your family, friends and colleague. Thank you for reading. Go on get cooking!

Easiest Way to Prepare Award-winning "Crunchy Chicken Popcorn"

Easiest Way to Prepare Award-winning "Crunchy Chicken Popcorn"

"Crunchy Chicken Popcorn".

"Crunchy Chicken Popcorn"

Hello everybody, I hope you're having an amazing day today. Today, I will show you a way to prepare a special dish, "crunchy chicken popcorn". It is one of my favorites food recipes. This time, I am going to make it a bit unique. This is gonna smell and look delicious.

"Crunchy Chicken Popcorn" is one of the most popular of recent trending foods in the world. It is appreciated by millions daily. It's easy, it's quick, it tastes yummy. "Crunchy Chicken Popcorn" is something that I have loved my entire life. They're fine and they look fantastic.

To begin with this recipe, we have to prepare a few ingredients. You can have "crunchy chicken popcorn" using 19 ingredients and 8 steps. Here is how you cook it.

The ingredients needed to make "Crunchy Chicken Popcorn":

  1. {Prepare of marinade the chicken.
  2. {Get of chicken breast.
  3. {Make ready of red chili powder.
  4. {Take of garlic powder.
  5. {Prepare of vinegar.
  6. {Prepare of chili sauce.
  7. {Take of soya sauce.
  8. {Make ready of milk.
  9. {Make ready of chili flakes.
  10. {Prepare of Salt.
  11. {Make ready of egg (add to marinade Chicken before coating).
  12. {Make ready of Coating.
  13. {Get of all-purpose flour.
  14. {Prepare of corn flour.
  15. {Take of red chili powder.
  16. {Get of garlic powder.
  17. {Get of Salt.
  18. {Prepare of chilled water.
  19. {Make ready of Oil for deep frying.

Steps to make "Crunchy Chicken Popcorn":

  1. Cut the chicken to bite size pieces and add them to a bowl along with all marinated ingredients. Mix it well. Keep it refrigerator cover with a cling wrap for at least 2-3 hrs..
  2. Take a mixing bowl to add maida, cornflour, salt to taste red chili powder, garlic powder and mix it well and keep it aside..
  3. After 2-3 hrs take the chicken out of the refrigerator. Add egg and mix it well..
  4. Take the pieces of chicken one by one at a time and coat them in the flour mixture. Keep it aside..
  5. Then dip into chilled water and again coat to the flour mixture and keep in the refrigerator for 5-6 minutes..
  6. Drop each coated chicken piece into the medium hot oil. Deep fry the chicken pieces on low flame until they turn golden brown..
  7. Take fried chicken pieces out and place them on kitchen paper..
  8. Popcorn chicken is ready to Serve.

So that is going to wrap it up for this special food "crunchy chicken popcorn" recipe. Thank you very much for your time. I am sure that you will make this at home. There is gonna be interesting food at home recipes coming up. Remember to bookmark this page on your browser, and share it to your loved ones, colleague and friends. Thank you for reading. Go on get cooking!

Step-by-Step Guide to Prepare Award-winning Black Chickpeas veggie kabab

Step-by-Step Guide to Prepare Award-winning Black Chickpeas veggie kabab

Black Chickpeas veggie kabab.

Black Chickpeas veggie kabab

Hello everybody, hope you are having an amazing day today. Today, we're going to prepare a distinctive dish, black chickpeas veggie kabab. It is one of my favorites food recipes. This time, I'm gonna make it a bit unique. This is gonna smell and look delicious.

Black Chickpeas veggie kabab is one of the most popular of current trending foods in the world. It is enjoyed by millions daily. It is easy, it is quick, it tastes delicious. They are nice and they look wonderful. Black Chickpeas veggie kabab is something that I have loved my entire life.

To get started with this recipe, we have to prepare a few ingredients. You can have black chickpeas veggie kabab using 19 ingredients and 7 steps. Here is how you can achieve it.

The ingredients needed to make Black Chickpeas veggie kabab:

  1. {Prepare 1 cup of soaked black chickpeas.
  2. {Prepare 2 of any bread slice.
  3. {Make ready 1 cup of chopped carrots.
  4. {Take 1 cup of chopped greenpapers.
  5. {Make ready 1 cup of chopped onions.
  6. {Make ready 2 of medium sized boiled potatoes.
  7. {Take 1 of red dried chilli.
  8. {Make ready of All Spices:.
  9. {Prepare 1/2 tablespoon of chilli powder.
  10. {Take 1/2 tablespoon of turmeric powder.
  11. {Get 1/2 tablespoon of garlic salt.
  12. {Take 1 tablespoon of ginger paste.
  13. {Prepare 1 tablespoon of chaat masala.
  14. {Prepare 1 tablespoon of garam masala.
  15. {Get 1 tablespoon of cumin powder.
  16. {Make ready 1 tablespoon of lemon juice.
  17. {Make ready 1/2 tablespoon of sugar.
  18. {Take of Salt as per taste.
  19. {Get 2 tablespoons of oil.

Steps to make Black Chickpeas veggie kabab:

  1. Grind the boiled black chickpeas with red dry chilli in a mixer and take it out in a bowl..
  2. Grind the bread and add it into a chickpea mixture..
  3. Mixed all chopped veggies with a mixture and add all the spices mentioned in a list. Balance the salt as per your taste. Add 2 tablespoons of oil..
  4. If mixer is lumpy or wet then add 2 tablespoons of all purpose flour and make sure it is enough dry to make a roll out of it..
  5. Now put some oil in your palm so the mixture doesn’t stick and take a small portion and press between your palm to give it a nice round shape..
  6. Once you finish with the mixture, you can now half fry or deep fry the kabab as you like..
  7. Serve it with peanut/tamarind chutney or stuff it inside the bread with cheese and enjoy it 🙂.

So that is going to wrap this up for this special food black chickpeas veggie kabab recipe. Thanks so much for your time. I'm confident that you will make this at home. There's gonna be interesting food at home recipes coming up. Don't forget to save this page in your browser, and share it to your loved ones, friends and colleague. Thanks again for reading. Go on get cooking!

Recipe of Speedy April stator tot casserole

Recipe of Speedy April stator tot casserole

April stator tot casserole.

April stator tot casserole

Hey everyone, I hope you are having an incredible day today. Today, I will show you a way to prepare a special dish, april stator tot casserole. It is one of my favorites. For mine, I'm gonna make it a bit unique. This will be really delicious.

April stator tot casserole is one of the most well liked of current trending meals in the world. It's easy, it is fast, it tastes delicious. It is enjoyed by millions every day. They are fine and they look fantastic. April stator tot casserole is something that I have loved my entire life.

To get started with this particular recipe, we must prepare a few components. You can have april stator tot casserole using 10 ingredients and 7 steps. Here is how you cook that.

The ingredients needed to make April stator tot casserole:

  1. {Prepare 2 lb of hamburger meat.
  2. {Prepare 1 can of cream of patoto.
  3. {Get 2 packages of grated cheese.
  4. {Get 2 large of onions.
  5. {Prepare 1 packages of tator tots.
  6. {Prepare 1 packages of bacon.
  7. {Make ready 1 can of cream of celery.
  8. {Take 1 tbsp of salt.
  9. {Get 1 tbsp of pepper.
  10. {Get 3 tbsp of cajun spice.

Steps to make April stator tot casserole:

  1. preheat oven to 400.
  2. cook ground meat and one diced up onion til meat is brown.
  3. cut your Bacon up to bite size piece and fry.
  4. after Browning meat drain and place back in pan combine can of celery can of patoto and 1 package of cheese and mix in with meat.
  5. combine your Bacon in with meat and pour in a casserole dish.
  6. pour tots on top of meat then pour cheese on top of tots place in oven for 45 minutes.
  7. at very end turn boiler on for a couple of minutes til golden brown.. take out and enjoy.

So that is going to wrap this up for this special food april stator tot casserole recipe. Thanks so much for reading. I'm sure you can make this at home. There is gonna be interesting food in home recipes coming up. Remember to save this page on your browser, and share it to your loved ones, colleague and friends. Thank you for reading. Go on get cooking!

How to Make Ultimate French toast with Indian twist

How to Make Ultimate French toast with Indian twist

French toast with Indian twist.

French toast with Indian twist

Hey everyone, I hope you're having an amazing day today. Today, I will show you a way to make a special dish, french toast with indian twist. It is one of my favorites food recipes. For mine, I'm gonna make it a little bit unique. This will be really delicious.

French toast with Indian twist is one of the most favored of recent trending meals in the world. It's simple, it is fast, it tastes yummy. It is enjoyed by millions every day. They're fine and they look wonderful. French toast with Indian twist is something which I've loved my entire life.

To get started with this particular recipe, we have to prepare a few components. You can cook french toast with indian twist using 7 ingredients and 3 steps. Here is how you can achieve it.

The ingredients needed to make French toast with Indian twist:

  1. {Prepare 4 pieces of bread.
  2. {Prepare 3 of eggs.
  3. {Make ready 1/2 cup of milk.
  4. {Prepare 1 tbsp of salt, haldi.
  5. {Get 1/2 cup of chopped onion and green chilli.
  6. {Get few of green chillies.
  7. {Get as required of Oil.

Instructions to make French toast with Indian twist:

  1. Take a big bowl. Mix the eggs and milk and add salt and haldi. Make a good mixture. Then Dip the bread from both sides. Make sure the bread soaks the eggs..
  2. Then add oil in pan. Add the bread. Sprinkle some chopped onion and chilli on top. Fry till golden brown on each side..
  3. Serve with tomato sauce..

So that is going to wrap this up with this exceptional food french toast with indian twist recipe. Thank you very much for your time. I am sure that you can make this at home. There is gonna be interesting food at home recipes coming up. Remember to bookmark this page in your browser, and share it to your family, colleague and friends. Thanks again for reading. Go on get cooking!

Step-by-Step Guide to Prepare Quick Crispy Wagyu Beef and Lime Tostadas

Step-by-Step Guide to Prepare Quick Crispy Wagyu Beef and Lime Tostadas

Crispy Wagyu Beef and Lime Tostadas.

Crispy Wagyu Beef and Lime Tostadas

Hello everybody, I hope you're having an incredible day today. Today, I will show you a way to make a distinctive dish, crispy wagyu beef and lime tostadas. It is one of my favorites. For mine, I'm gonna make it a little bit unique. This will be really delicious.

Crispy Wagyu Beef and Lime Tostadas is one of the most popular of current trending foods in the world. It's appreciated by millions daily. It is simple, it is quick, it tastes yummy. They're nice and they look fantastic. Crispy Wagyu Beef and Lime Tostadas is something that I have loved my whole life.

To get started with this recipe, we must first prepare a few components. You can have crispy wagyu beef and lime tostadas using 33 ingredients and 8 steps. Here is how you cook it.

The ingredients needed to make Crispy Wagyu Beef and Lime Tostadas:

  1. {Prepare 1 of Large Sweet Onion (julienned).
  2. {Get 2 OZ of Butter.
  3. {Take 2 TSP of Kosher Salt.
  4. {Get 3 TBSP of Grapeseed Oil.
  5. {Take of Braising.
  6. {Prepare 2 LB of Double 8 Cattle Company Fullblood Wagyu Bottom Round Steak.
  7. {Get of Kosher Salt (to season).
  8. {Get of Freshly Ground Black Pepper (to season).
  9. {Take 2 TBSP of Grapeseed Oil.
  10. {Make ready 1 of Large Sweet Onion (quartered).
  11. {Prepare 4 CUP of Beef Stock.
  12. {Take of Wagyu Beef Mixture.
  13. {Get 1 TSP of Kosher Salt.
  14. {Prepare 2 TSP of Ground Cumin.
  15. {Take 5 of Garlic Cloves (minced).
  16. {Get 1/2 CUP of Lime Juice.
  17. {Take 3 TBSP of Fresh Oregano (chopped).
  18. {Take of Salsa.
  19. {Take 3 of Roma Tomatoes (small diced).
  20. {Get 1/2 of Red Onion (minced).
  21. {Take 2 of Garlic Cloves (minced).
  22. {Make ready 1 of Lime (juiced).
  23. {Take 1 of Jalapeno (seeded and minced).
  24. {Get 1/2 CUP of Fresh Cilantro (minced).
  25. {Take 1/2 TSP of Kosher Salt.
  26. {Prepare of Tostadas.
  27. {Make ready 8 of Corn Tortillas.
  28. {Get 3 TBSP of Grapeseed Oil (plus additional as needed for frying).
  29. {Take of Assembly.
  30. {Make ready 1 of Large Avocado (peeled, pitted, and sliced).
  31. {Make ready 2 CUP of Green Leaf Lettuce (shredded).
  32. {Take 1/2 CUP of Crema or Sour Cream.
  33. {Make ready 1 CUP of Crumbled Cotija Cheese.

Instructions to make Crispy Wagyu Beef and Lime Tostadas:

  1. PREPARING THE BRAISED FULLBLOOD WAGYU BEEF Heat 2 tablespoons grapeseed oil in a large Dutch oven (or pan) over medium-high heat. Season the Fullblood Wagyu bottom round steak with kosher salt and freshly ground black pepper. Once the oil is hot and slightly smoking, add in the steak. Sear the steak on each side for 3-4 minutes to get a nice brown crust on both sides..
  2. Add in the quartered sweet onion, beef stock, and bring to a simmer. Reduce the heat to low, and cover the Dutch oven with a lid. Cook on low (braising the beef) for 3 hours. Remove the Wagyu beef from the Dutch oven and place it in a bowl.Shred the beef with two forks..
  3. PREPARING THE WAGYU BEEF MIXTURE In a medium size bowl, mix together the shredded Wagyu beef, chopped fresh oregano, lime juice, kosher salt, ground cumin, and minced garlic. Let the Wagyu beef mixture marinate for 15 minutes..
  4. PREPARING THE SALSA Mix together the diced Roma tomatoes, minced garlic, minced cilantro, seeded and minced jalapeno, kosher salt, lime juice, and minced red onion. Mix together, and reserve..
  5. PREPARING THE ONIONS AND CRISPY WAGYU BEEF Discard the braising liquid and onions from the Dutch oven. Return the Dutch oven to medium-high heat. Add in the julienned onions, butter, and 2 teaspoon of kosher salt. Cook the onions for about 10 minutes until caramelized. Remove the onions from the Dutch oven, and place them in a bowl. Reserve.Add in 3 tablespoons of grapeseed oil to the Dutch oven..
  6. Once the oil is hot add, in the shredded Wagyu beef mixture (drain off the lime juice if there is any standing in the bowl). Let the beef fry in the oil for 2-3 minutes until crispy. Use a slotted spoon to remove the beef from the Dutch oven, and mix it with the caramelized onions.
  7. PREPARING THE TOSTADAS Heat a large saute pan over medium-high heat. Add in the grapeseed oil.Once the oil is hot, add in one corn tortilla in at a time.Fry each tortilla until golden brown on both sides. Transfer the fried tortillas to a plate with paper towels, and allow them to drain.Repeat the process until all of the tortillas are fried..
  8. FINAL STEPS Lay down the fried corn tortillas, and divide the onions and crispy Wagyu beef between the tortillas.Top with shredded lettuce, salsa, crumbled Cotija cheese, and crema. Put a few slices of avocado on each tortilla. Serve immediately, and enjoy!.

So that's going to wrap it up with this special food crispy wagyu beef and lime tostadas recipe. Thanks so much for your time. I am confident you will make this at home. There's gonna be interesting food at home recipes coming up. Remember to bookmark this page on your browser, and share it to your family, friends and colleague. Thank you for reading. Go on get cooking!

Recipe of Super Quick Homemade Lemon Garlic Chicken Thighs

Recipe of Super Quick Homemade Lemon Garlic Chicken Thighs

Lemon Garlic Chicken Thighs.

Lemon Garlic Chicken Thighs

Hello everybody, it's Drew, welcome to our recipe page. Today, I will show you a way to make a distinctive dish, lemon garlic chicken thighs. One of my favorites. This time, I'm gonna make it a bit unique. This will be really delicious.

Lemon Garlic Chicken Thighs is one of the most popular of current trending foods on earth. It's simple, it is fast, it tastes yummy. It's enjoyed by millions daily. Lemon Garlic Chicken Thighs is something that I've loved my whole life. They're fine and they look wonderful.

To get started with this recipe, we must prepare a few ingredients. You can cook lemon garlic chicken thighs using 11 ingredients and 6 steps. Here is how you can achieve it.

The ingredients needed to make Lemon Garlic Chicken Thighs:

  1. {Get 8 of Chicken Thighs.
  2. {Take 1 3/4 tsp of Salt.
  3. {Prepare 1 tsp of Freshly Ground Pepper.
  4. {Get 1/2 tsp of Crushed Red Pepper.
  5. {Get 1/2 cup of All-Purpose Flour.
  6. {Prepare 1/4 cup of Olive Oil.
  7. {Get 3 cup of Thinly Sliced Onions.
  8. {Take 2 head of Garlic.
  9. {Get 1 of Bay Leaf.
  10. {Take 1/2 cup of Fresh Squeezed Lemon Juice.
  11. {Make ready 1 1/2 cup of Chicken Broth.

Instructions to make Lemon Garlic Chicken Thighs:

  1. Preheat oven to 350° F..
  2. Season the chicken thighs with 1 1/4 tsp. of the salt & 1 tsp. of the freshly ground pepper..
  3. Lightly dredge the chicken with the flour and set aside..
  4. Heat the oil over a medium-high heat in a large saute pan. When the oil is heated, add the thighs and brown well on both sides (about 6 minutes each side). Remove from pan and then set aside..
  5. Add the onions to the oil and cook, stirring until wilted, about 3 minutes..
  6. Add the garlic, crushed red pepper, remaining 1/2 tsp. salt, and the bay leaf. Cook for 1 minute. Add the lemon juice, chicken broth, and browned chicken thighs to the pan. Bring the mixture to a simmer, cover with lid, and place in the oven. Allow to bake for 20 minutes, remove from oven, remove lid and cook on stovetop for an additional 15 minutes, or until cooked through and tender..

So that's going to wrap it up for this exceptional food lemon garlic chicken thighs recipe. Thank you very much for reading. I am confident you can make this at home. There's gonna be more interesting food at home recipes coming up. Don't forget to save this page on your browser, and share it to your loved ones, friends and colleague. Thank you for reading. Go on get cooking!

Recipe of Quick 🧑🏽‍🍳🧑🏼‍🍳Thai Khao Tom Goong • Thai Rice Soup with
Prawn |ThaiChef Food

Recipe of Quick 🧑🏽‍🍳🧑🏼‍🍳Thai Khao Tom Goong • Thai Rice Soup with Prawn |ThaiChef Food

🧑🏽‍🍳🧑🏼‍🍳Thai Khao Tom Goong • Thai Rice Soup with Prawn |ThaiChef Food.

🧑🏽‍🍳🧑🏼‍🍳Thai Khao Tom Goong • Thai Rice Soup with Prawn |ThaiChef Food

Hey everyone, hope you are having an incredible day today. Today, we're going to make a distinctive dish, 🧑🏽‍🍳🧑🏼‍🍳thai khao tom goong • thai rice soup with prawn |thaichef food. One of my favorites food recipes. This time, I will make it a bit tasty. This is gonna smell and look delicious.

🧑🏽‍🍳🧑🏼‍🍳Thai Khao Tom Goong • Thai Rice Soup with Prawn

To begin with this particular recipe, we have to first prepare a few components. You can cook 🧑🏽‍🍳🧑🏼‍🍳thai khao tom goong • thai rice soup with prawn |thaichef food using 13 ingredients and 3 steps. Here is how you cook that.

The ingredients needed to make 🧑🏽‍🍳🧑🏼‍🍳Thai Khao Tom Goong • Thai Rice Soup with Prawn |ThaiChef Food:

  1. {Take 200 g. of Cooked rice.
  2. {Prepare 4 of cup. Water.
  3. {Take 1 tbsp. of Soy sauce.
  4. {Prepare 1/2 tbsp. of Fish sauce.
  5. {Get 1/4 tsp. of Ground White pepper.
  6. {Get 1/4 tsp. of Salt.
  7. {Prepare 10 pcs. of Prawn.
  8. {Prepare 30 g. of Chopped garlic.
  9. {Prepare 30 g. of Ginger.
  10. {Prepare 30 g. of Galangal.
  11. {Prepare 10 g. of Coriander leave.
  12. {Get 10 g. of Spring onion.
  13. {Take 100 g. of Vegetable oil.

Instructions to make 🧑🏽‍🍳🧑🏼‍🍳Thai Khao Tom Goong • Thai Rice Soup with Prawn |ThaiChef Food:

  1. Chopped Garlic and Galangal and fry on low heat until starting turn color then remove • add crispy garlic and galangal oil for stock • add water and coriander root and bring it too boil • blanch prawn and transfer to cold water to keep it firm..
  2. Use prawn shell for stock (if don't have no problem) • Do not boil prawn shell too long stock will turn black • add cooked rice and seasoning with Salt + soy sauce + fish sauce and rock sugar • add prawn at last one • Done !😋.
  3. Before serve on top with coriander leaves and Spring onion + ginger + crispy garlic and galangal oil 😋😋😋.

So that is going to wrap it up for this exceptional food 🧑🏽‍🍳🧑🏼‍🍳thai khao tom goong • thai rice soup with prawn |thaichef food recipe. Thank you very much for reading. I'm confident you can make this at home. There's gonna be interesting food at home recipes coming up. Remember to bookmark this page on your browser, and share it to your family, colleague and friends. Thanks again for reading. Go on get cooking!

How to Make Speedy Thai Street Food • Fried Shredded Pork with Crispy
Shallot •Thai Street Vendor food | ThaiChef Food

How to Make Speedy Thai Street Food • Fried Shredded Pork with Crispy Shallot •Thai Street Vendor food | ThaiChef Food

Thai Street Food • Fried Shredded Pork with Crispy Shallot •Thai Street Vendor food | ThaiChef Food.

Thai Street Food • Fried Shredded Pork with Crispy Shallot •Thai Street Vendor food | ThaiChef Food

Hey everyone, I hope you are having an amazing day today. Today, I will show you a way to prepare a special dish, thai street food • fried shredded pork with crispy shallot •thai street vendor food | thaichef food. One of my favorites food recipes. For mine, I will make it a bit unique. This is gonna smell and look delicious.

ThaiChef Food is one of the most favored of recent trending foods in the world. It's easy, it is fast, it tastes delicious. It's enjoyed by millions daily. ThaiChef Food is something which I have loved my entire life.

To get started with this recipe, we must first prepare a few ingredients. You can cook thai street food • fried shredded pork with crispy shallot •thai street vendor food | thaichef food using 5 ingredients and 2 steps. Here is how you cook it.

The ingredients needed to make Thai Street Food • Fried Shredded Pork with Crispy Shallot •Thai Street Vendor food | ThaiChef Food:

  1. {Make ready 550 g. of Pork tenderloin.
  2. {Prepare 150 g. of Sugar.
  3. {Take 160 g. of Shallot.
  4. {Prepare 2 tsp. of Salt.
  5. {Take of Vegetable oil.

Instructions to make Thai Street Food • Fried Shredded Pork with Crispy Shallot •Thai Street Vendor food | ThaiChef Food:

  1. Boil pork until fully cooked And shred as shown.
  2. Mix well Shredded pork+Sugar + salt before turn on heat • after mix turn on to medium heat and fried for 10 mins• then turn to medium low heat fried 10 mins • add sliced Shallot and fried more 7-10 to mins on low heat until get color as shown • strain its • separated shredded for more crispy • Done 😋😋..!!.

So that's going to wrap this up with this special food thai street food • fried shredded pork with crispy shallot •thai street vendor food | thaichef food recipe. Thanks so much for reading. I'm confident you can make this at home. There is gonna be interesting food at home recipes coming up. Remember to save this page on your browser, and share it to your loved ones, colleague and friends. Thank you for reading. Go on get cooking!

Recipe of Quick Taylor's Sangria

Recipe of Quick Taylor's Sangria

Taylor's Sangria.

Taylor's Sangria

Hello everybody, it's Drew, welcome to our recipe page. Today, I will show you a way to make a distinctive dish, taylor's sangria. It is one of my favorites food recipes. For mine, I will make it a bit tasty. This will be really delicious.

Taylor's Sangria is one of the most popular of recent trending foods in the world. It is simple, it is fast, it tastes delicious. It is appreciated by millions daily. They're nice and they look wonderful. Taylor's Sangria is something that I have loved my entire life.

To begin with this recipe, we must first prepare a few ingredients. You can cook taylor's sangria using 7 ingredients and 8 steps. Here is how you can achieve it.

The ingredients needed to make Taylor's Sangria:

  1. {Take of sangria.
  2. {Prepare 1 of bottle semi sweet red wine, use your favorite. Don't waste money on an expensive bottle as this is being mixed.
  3. {Take 1 of red delicious apple, cored and sliced.
  4. {Get 1 large of orange, sliced.
  5. {Prepare 1 of lemon, sliced.
  6. {Take 1/2 cup of triple sec.
  7. {Make ready 1 liter of bottle of club soda.

Instructions to make Taylor's Sangria:

  1. In a large decanter or pitcher, pour in wine, triple sec..
  2. Prepare and add fruit..
  3. Set in refrigerator or on counter for 3-4 hours for fruit to give up their flavor..
  4. Just before serving add the club soda and mix..
  5. I like serving it cold. Don't forget to eat the fruit! The best part!.
  6. Recipe by taylor68too.
  7. A reisling wine, or ask your attendant at a liquor store for some wine suggestions if your unsure which type to use..
  8. If I do use a dryer tasting wine which I prefer, I substitute a sprite soda for the club soda..

So that is going to wrap this up with this special food taylor's sangria recipe. Thank you very much for reading. I am confident you will make this at home. There's gonna be more interesting food at home recipes coming up. Don't forget to save this page in your browser, and share it to your loved ones, colleague and friends. Thanks again for reading. Go on get cooking!

Recipe of Award-winning Vanilla Panna Cotta

Recipe of Award-winning Vanilla Panna Cotta

Vanilla Panna Cotta.

Vanilla Panna Cotta

Hey everyone, it is Jim, welcome to our recipe site. Today, we're going to prepare a special dish, vanilla panna cotta. One of my favorites. For mine, I will make it a little bit unique. This will be really delicious.

Vanilla Panna Cotta is one of the most well liked of current trending foods on earth. It's appreciated by millions daily. It's simple, it's fast, it tastes delicious. They are nice and they look fantastic. Vanilla Panna Cotta is something which I've loved my entire life.

To get started with this particular recipe, we have to first prepare a few ingredients. You can have vanilla panna cotta using 6 ingredients and 5 steps. Here is how you can achieve it.

The ingredients needed to make Vanilla Panna Cotta:

  1. {Take of half and half.
  2. {Make ready of unflavored gelatin.
  3. {Make ready of Vanilla flavor white melting wafers.
  4. {Make ready of sweetened condensed milk.
  5. {Get of vanilla extract.
  6. {Get of Crushed vanilla wafers for topping.

Instructions to make Vanilla Panna Cotta:

  1. In a saucepan put in your cold half and half, then sprinkle on top of half and half your unflavored gelatin, let gelatin sit for about a minute, then heat until gelatin has dissolved, stirring occasionally......
  2. Now add your candy to saucepan, sweetened condensed milk and vanilla extract, boil until candy is thoroughly melted, stirring occasionally.......Remove from heat........
  3. Let mixture cool for several minutes, then pour into dessert cups.......
  4. Cover and refrigerate overnight or for several hours until panna cotta is completely set........
  5. Serve topped with your crushed candy pieces and enjoy 😉!.

So that's going to wrap this up for this special food vanilla panna cotta recipe. Thank you very much for your time. I'm confident you can make this at home. There is gonna be more interesting food at home recipes coming up. Don't forget to save this page on your browser, and share it to your loved ones, friends and colleague. Thank you for reading. Go on get cooking!