Recipe of Ultimate Easy No Bake Italian Meatballs

Recipe of Ultimate Easy No Bake Italian Meatballs

Easy No Bake Italian Meatballs.

Easy No Bake Italian Meatballs

Hello everybody, it's Drew, welcome to my recipe page. Today, we're going to prepare a distinctive dish, easy no bake italian meatballs. One of my favorites. For mine, I'm gonna make it a little bit unique. This will be really delicious.

Easy No Bake Italian Meatballs is one of the most favored of current trending foods on earth. It's simple, it's quick, it tastes yummy. It's appreciated by millions daily. They're fine and they look wonderful. Easy No Bake Italian Meatballs is something that I've loved my entire life.

To get started with this recipe, we must first prepare a few components. You can cook easy no bake italian meatballs using 12 ingredients and 4 steps. Here is how you can achieve it.

The ingredients needed to make Easy No Bake Italian Meatballs:

  1. {Prepare 2 of eggs.
  2. {Get 1/4 cup of whole milk.
  3. {Take 1/2 cup of Italian bread crumbs.
  4. {Get 1/3 cup of grated Parmesan cheese.
  5. {Prepare 1/4 cup of freshly chopped Italian parsley.
  6. {Take 1 teaspoon of dried Italian seasoning.
  7. {Get 3 cloves of finely minced garlic.
  8. {Make ready 1/2 Cup of finely diced onion.
  9. {Get 1/2 teaspoon of table salt.
  10. {Prepare 1/4 teaspoon of ground black pepper.
  11. {Get 1 pound of fresh 80/20 ground beef.
  12. {Prepare of Addition cheese for toppings.

Instructions to make Easy No Bake Italian Meatballs:

  1. Mix first 10 ingredients together until well blended. Let sit for around 5 minutes to come together. If using Dried parsley, do not use a 1/4 cup. Its way to strong in flavor. Maybe a tablespoon at most..
  2. Mix in gently the ground beef, until the mixture just comes together..
  3. Add your favorite marinara sauce to a large stock pot and bring to a simmer. Form meatballs to the size of your liking, and add single layer in simmering sauce. Cover and let simmer about 15 minutes. After 15 minutes gently turn each meatball over and continue simmering another 10 minutes. They should be done at this point. They will get more tough the longer you cook them..
  4. Top with your favorite cheese, or any other toppings that you like. Or serve them with pasta for a family style meal. Enjoy.

So that's going to wrap it up with this exceptional food easy no bake italian meatballs recipe. Thank you very much for reading. I am confident that you can make this at home. There is gonna be interesting food at home recipes coming up. Don't forget to save this page in your browser, and share it to your family, colleague and friends. Thank you for reading. Go on get cooking!

Step-by-Step Guide to Prepare Any-night-of-the-week Jalapeño poppers
(regular--full peppers or half)

Step-by-Step Guide to Prepare Any-night-of-the-week Jalapeño poppers (regular--full peppers or half)

Jalapeño poppers (regular--full peppers or half). Jalapeño poppers, or jalapeño bites, are jalapeño peppers that have been hollowed out, stuffed with a mixture of cheese, spices, and sometimes ground meat, and sometimes breaded and deep fried. They are sometimes called armadillo eggs. This crowd-pleasing jalapeno poppers recipe is made with cream cheese, cheddar cheese, and bacon.

Jalapeño poppers (regular--full peppers or half) Make sure you use regular bacon (thick-sliced won't crisp up as much, and would overpower the jalapeño flavor). Baked Jalapeño Poppers by Madhavi ll Easy Oven Baked Stuffed Jalapeños - Vegetarian Medley. Make your own restaurant-quality jalapeño poppers at home.

Hello everybody, it is Louise, welcome to our recipe site. Today, I will show you a way to prepare a distinctive dish, jalapeño poppers (regular--full peppers or half). One of my favorites. This time, I'm gonna make it a bit tasty. This will be really delicious.

Jalapeño poppers, or jalapeño bites, are jalapeño peppers that have been hollowed out, stuffed with a mixture of cheese, spices, and sometimes ground meat, and sometimes breaded and deep fried. They are sometimes called armadillo eggs. This crowd-pleasing jalapeno poppers recipe is made with cream cheese, cheddar cheese, and bacon.

Jalapeño poppers (regular--full peppers or half) is one of the most popular of recent trending meals on earth. It is easy, it is quick, it tastes yummy. It's enjoyed by millions every day. They are fine and they look wonderful. Jalapeño poppers (regular--full peppers or half) is something that I have loved my whole life.

To get started with this recipe, we have to prepare a few components. You can cook jalapeño poppers (regular--full peppers or half) using 3 ingredients and 5 steps. Here is how you can achieve it.

The ingredients needed to make Jalapeño poppers (regular--full peppers or half):

  1. {Get 12 of jalapenos (or 6 cut in 12 halves).
  2. {Prepare 2 packs of cream cheese.
  3. {Make ready of Bacon.

With a crispy exterior and cheesy filling, this Remove the jalapeños poppers and let them drain on paper towels before plating. To serve whole jalapeño poppers: Find halves that are similar in size, stuff them with less filling so they won't. These jalapeño poppers are stuffed with a fresh, herbed cream cheese mixture and topped with just enough cheddar cheese to turn Most jalapeño popper recipes suggest slicing the jalapeños in half, but there is a better way! Forget everything you know about jalapeño poppers.

Instructions to make Jalapeño poppers (regular--full peppers or half):

  1. Preheat oven 450.
  2. Clean peppers (cut in halves if needed) -- for less heat, Soak in a jar, in sprite (or off brand) for at least 2 hrs..
  3. Fill with cream cheese, I like to really fill mine :).
  4. Wrap in bacon.
  5. Bake for 35 minutes.

We have a classic recipe, if that's your thing—but our Everything It seems you've found your new go-to party appetizer. Make sure that the jalapenos are par-cooked before adding the cream cheese filling to ensure that the cream cheese doesn't burn. These easy, BAKED jalapeno poppers are creamy, cheesy, crunchy and wickedly addicting! They are are an easy, make ahead appetizer They are also incredibly simple to prepare and can be prepped ahead of time then just popped in the oven. To make, fresh jalapenos are sliced in half and loaded.

So that's going to wrap it up for this special food jalapeño poppers (regular--full peppers or half) recipe. Thank you very much for your time. I'm sure you can make this at home. There is gonna be more interesting food at home recipes coming up. Remember to save this page in your browser, and share it to your loved ones, colleague and friends. Thanks again for reading. Go on get cooking!

Simple Way to Prepare Homemade Baked Tortellini with Ricotta and
Mozzarella cheese 🧀

Simple Way to Prepare Homemade Baked Tortellini with Ricotta and Mozzarella cheese 🧀

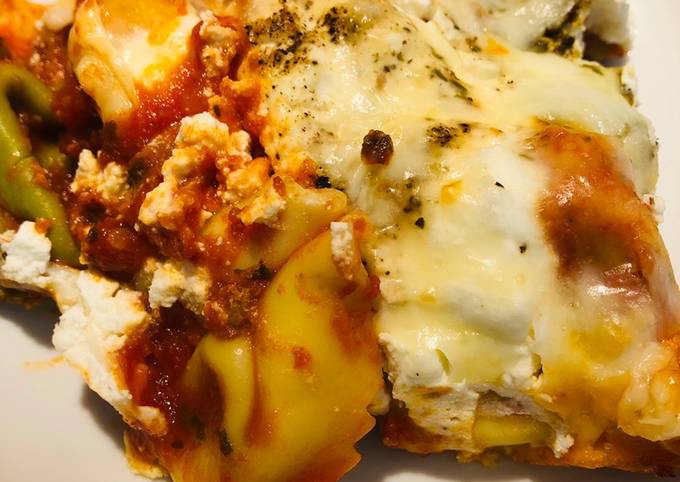
Baked Tortellini with Ricotta and Mozzarella cheese 🧀. This meatless baked ziti (pasta al forno) is a simple, yet hearty dish. It's a combination of Sunday sauce or a quick marinara, creamy ricotta (Polly-o. A cheesy baked tortellini recipe, caprese style, with tomatoes, mozzarella, basil and green olives, this is one of the most delicious I use dried tortellini when I happen to have them in the pantry and they are delicious, but most of the times I prefer to buy the fresh tortellini filled with ricotta cheese.

Baked Tortellini with Ricotta and Mozzarella cheese 🧀 Homemade Vegan Tortellini filled with Almond Ricotta is super easy to make and so delicious! This Pasta Recipe is a step-by-step guide to making the perfect Vegan Cheese Tortellini with fresh pasta dough. I made the almond ricotta and used it to fill manicotti.

Hello everybody, I hope you are having an amazing day today. Today, I will show you a way to make a distinctive dish, baked tortellini with ricotta and mozzarella cheese 🧀. It is one of my favorites. This time, I am going to make it a bit tasty. This is gonna smell and look delicious.

Baked Tortellini with Ricotta and Mozzarella cheese 🧀 is one of the most popular of recent trending foods in the world. It's easy, it's fast, it tastes yummy. It's enjoyed by millions daily. They are nice and they look fantastic. Baked Tortellini with Ricotta and Mozzarella cheese 🧀 is something that I've loved my entire life.

This meatless baked ziti (pasta al forno) is a simple, yet hearty dish. It's a combination of Sunday sauce or a quick marinara, creamy ricotta (Polly-o. A cheesy baked tortellini recipe, caprese style, with tomatoes, mozzarella, basil and green olives, this is one of the most delicious I use dried tortellini when I happen to have them in the pantry and they are delicious, but most of the times I prefer to buy the fresh tortellini filled with ricotta cheese.

To get started with this particular recipe, we must prepare a few components. You can have baked tortellini with ricotta and mozzarella cheese 🧀 using 8 ingredients and 9 steps. Here is how you can achieve that.

The ingredients needed to make Baked Tortellini with Ricotta and Mozzarella cheese 🧀:

  1. {Prepare 1 bag (20 ounce) of tortellini (your favorite flavor !).
  2. {Prepare of Salt for boiling water.
  3. {Take of Olive oil cooking spray.
  4. {Make ready of 1 jar pasta sauce (24 ounce) (your favorite flavor!).
  5. {Take 1 container (15 ounce) of whole milk ricotta cheese.
  6. {Make ready 1/8 teaspoon of black pepper.
  7. {Prepare 1 tablespoon of Italian seasoning.
  8. {Get of 2 cups shredded mozzarella cheese.

Cheese tortellini become a quick school-night supper, baked with Swiss chard, mushrooms, and mozzarella in a low-impact, high-flavor tomato sauce. Top with the mozzarella and parmesan. This ricotta cheese mixture features mozzarella and Romano cheeses and is perfect for your favorite Italian baked dishes - lasagna, baked ziti and more. Well, besides ricotta cheese of course, the mixture also has mozzarella and Romano cheeses, as well as fresh parsley, black pepper and eggs.

Steps to make Baked Tortellini with Ricotta and Mozzarella cheese 🧀:

  1. Boil tortellini until slightly done, about 3 minutes, don’t forget to salt your water!.
  2. Drain tortellini and place into a large baking pan that has been sprayed with olive oil cooking spray........
  3. Pour your pasta sauce all over tortellini, then stir tortellini lightly, making sure you coat them well with the sauce........
  4. Place several spoonfuls of your ricotta cheese all around tortellini.......
  5. Now sprinkle your black pepper and Italian seasoning all over ricotta cheese........
  6. Next, place your shredded mozzarella cheese all over ricotta cheese...........
  7. Cover baking pan and place in a preheated 350 degree oven for 40 minutes........
  8. Uncover baking pan and place back into oven and cook for another 10-15 minutes, or until cheese is golden on top.......
  9. Let cool for several minutes, then serve and enjoy 😉!!!.

Buttermilk biscuits are stuffed with mozzarella cheese, covered in pizza sauce and baked to golden perfection. Fresh spinach and plenty of ricotta, Romano and mozzarella make this a cheesy and hearty dish. This lasagna can also be made without the spinach. Spinach And Ricotta Tortellini Tortellini Bake Cooking Dishes Food Dishes Lacto Vegetarian Diet Vegetarian Casserole La Marmite Mexican Chicken Recipes Good No-boil Baked Cheese Tortellini With Pasta Sauce, Water, Cheese Tortellini, Shredded Mozzarella, Parmesan Cheese, Sausage. Collection by Antonio Mozzarella. · This baked ricotta is a rich, creamy, cheese spread made from ricotta cheese, eggs, Parmigiano-Reggiano, and herbs, and baked until puffed and golden.

So that is going to wrap it up for this special food baked tortellini with ricotta and mozzarella cheese 🧀 recipe. Thank you very much for your time. I am confident that you will make this at home. There's gonna be more interesting food in home recipes coming up. Remember to bookmark this page on your browser, and share it to your family, colleague and friends. Thanks again for reading. Go on get cooking!

How to Make Any-night-of-the-week Crispy and Juicy Chicken Karaage for
Bento

How to Make Any-night-of-the-week Crispy and Juicy Chicken Karaage for Bento

Crispy and Juicy Chicken Karaage for Bento.

Crispy and Juicy Chicken Karaage for Bento

Hello everybody, it is Louise, welcome to my recipe page. Today, I'm gonna show you how to make a distinctive dish, crispy and juicy chicken karaage for bento. It is one of my favorites food recipes. This time, I will make it a bit unique. This is gonna smell and look delicious.

Crispy and Juicy Chicken Karaage for Bento is one of the most popular of recent trending foods in the world. It is easy, it's quick, it tastes delicious. It is enjoyed by millions daily. Crispy and Juicy Chicken Karaage for Bento is something which I have loved my whole life. They are nice and they look fantastic.

To begin with this particular recipe, we must first prepare a few ingredients. You can cook crispy and juicy chicken karaage for bento using 10 ingredients and 4 steps. Here is how you can achieve it.

The ingredients needed to make Crispy and Juicy Chicken Karaage for Bento:

  1. {Get of Chicken thigh meat.
  2. {Prepare of ★Grated ginger.
  3. {Prepare of ★Grated garlic.
  4. {Get of ★Soy sauce.
  5. {Prepare of ★Sake.
  6. {Make ready of ★Sesame oil.
  7. {Make ready of Egg.
  8. {Take of ●Plain flour.
  9. {Get of ●Katakuriko.
  10. {Prepare of Frying oil.

Instructions to make Crispy and Juicy Chicken Karaage for Bento:

  1. Cut the chicken into bite-sized pieces. Pat dry the extra moisture. Put them in a plastic bag, and marinate with the ★ ingredients for over 30 minutes, over 2 hours if possible..
  2. Put in the beaten egg, and rub. And add the mixture of flour and katakuriko, and rub in. If you want to bring karaage for a lunch, prepare this the previous night to save time in the morning..
  3. Heat the oil to 170°C and deep-fry the chicken. When you drop them into the oil, adjust the shape of each pieces of the chicken to look neat..
  4. Let them sit for 5 minutes, and deep-fry at 180°C to make them crisp..

So that's going to wrap it up for this exceptional food crispy and juicy chicken karaage for bento recipe. Thank you very much for your time. I am sure that you will make this at home. There's gonna be more interesting food at home recipes coming up. Don't forget to bookmark this page on your browser, and share it to your family, colleague and friends. Thank you for reading. Go on get cooking!

Easiest Way to Prepare Ultimate Octoberfest Beer Cheese Dip

Easiest Way to Prepare Ultimate Octoberfest Beer Cheese Dip

Octoberfest Beer Cheese Dip.

Octoberfest Beer Cheese Dip

Hey everyone, I hope you're having an incredible day today. Today, I will show you a way to make a special dish, octoberfest beer cheese dip. It is one of my favorites. For mine, I will make it a little bit tasty. This is gonna smell and look delicious.

Octoberfest Beer Cheese Dip is one of the most popular of current trending foods on earth. It's easy, it's quick, it tastes yummy. It is enjoyed by millions daily. Octoberfest Beer Cheese Dip is something which I've loved my entire life. They're fine and they look wonderful.

To begin with this particular recipe, we must first prepare a few components. You can have octoberfest beer cheese dip using 5 ingredients and 6 steps. Here is how you cook it.

The ingredients needed to make Octoberfest Beer Cheese Dip:

  1. {Take 2 of pkgs. (8 oz. each) Philadelphia cream cheese, softened.
  2. {Take 1 cup of sour cream.
  3. {Get 2 cups of shredded Sharp cheddar cheese.
  4. {Take 1 packet of Ranch dip mix.
  5. {Get 1 bottle of beer, German or Belgian.

Instructions to make Octoberfest Beer Cheese Dip:

  1. Cream together cream cheese and sour cream..
  2. Mix in packet of ranch dip mix..
  3. Add cheddar cheese..
  4. Now the fun part, add in your favorite German or Belgian beer. I prefer Hoegaarden..
  5. Slowly add 3/4 of the bottle and mix until incorporated. Drink remaining 1/4 of bottle. :).
  6. You can place in fridge until ready to serve. Can be heated up in crockpot or on stove top until warm and cheese is fully melted. Enjoy with bread chunks or homemade pretzels..

So that is going to wrap it up for this special food octoberfest beer cheese dip recipe. Thanks so much for reading. I am confident you will make this at home. There's gonna be more interesting food in home recipes coming up. Don't forget to save this page in your browser, and share it to your loved ones, colleague and friends. Thank you for reading. Go on get cooking!

Steps to Prepare Ultimate Cajun K-rab Dip

Steps to Prepare Ultimate Cajun K-rab Dip

Cajun K-rab Dip.

Cajun K-rab Dip

Hello everybody, it's me again, Dan, welcome to my recipe page. Today, we're going to make a special dish, cajun k-rab dip. One of my favorites. For mine, I'm gonna make it a little bit unique. This will be really delicious.

Cajun K-rab Dip is one of the most favored of recent trending foods on earth. It is appreciated by millions daily. It's simple, it's quick, it tastes yummy. They're fine and they look wonderful. Cajun K-rab Dip is something which I have loved my whole life.

To get started with this recipe, we must prepare a few ingredients. You can cook cajun k-rab dip using 10 ingredients and 3 steps. Here is how you cook it.

The ingredients needed to make Cajun K-rab Dip:

  1. {Get 1/2 of lbs. immitation crab meat.
  2. {Take 8 oz of cream cheese.
  3. {Take 1/3 cup of sour cream.
  4. {Take 1 tbsp of hot sauce.
  5. {Take 1/2 tbsp of Worcestershire sauce.
  6. {Prepare 1/2 tbsp of Cajun seasoning.
  7. {Get 1/2 cup of shredded cheddar cheese.
  8. {Prepare 1/8 cup of minced onions.
  9. {Prepare 1/2 tsp of Adobo seasoning.
  10. {Get 1/2 tsp of Italian seasoning.

Steps to make Cajun K-rab Dip:

  1. Mix cream cheese, sour cream, hot sauce, Worcestershire sauce, Cajun seasoning, onions, adobo, and Italian seasoning in a bowl or blender..
  2. Gently fold n cheddar cheese and imitation crab meat..
  3. Chill for at least a half hour before serving..

So that is going to wrap this up with this exceptional food cajun k-rab dip recipe. Thank you very much for reading. I am sure you can make this at home. There's gonna be more interesting food at home recipes coming up. Remember to bookmark this page on your browser, and share it to your family, colleague and friends. Thanks again for reading. Go on get cooking!

How to Make Award-winning lamb shanks with red wine and barley

How to Make Award-winning lamb shanks with red wine and barley

lamb shanks with red wine and barley.

lamb shanks with red wine and barley

Hey everyone, it is Brad, welcome to our recipe site. Today, we're going to make a distinctive dish, lamb shanks with red wine and barley. It is one of my favorites. For mine, I am going to make it a little bit tasty. This will be really delicious.

lamb shanks with red wine and barley is one of the most popular of recent trending foods on earth. It's appreciated by millions every day. It is easy, it's fast, it tastes delicious. lamb shanks with red wine and barley is something that I've loved my whole life. They are nice and they look wonderful.

To begin with this particular recipe, we have to prepare a few ingredients. You can have lamb shanks with red wine and barley using 15 ingredients and 8 steps. Here is how you cook it.

The ingredients needed to make lamb shanks with red wine and barley:

  1. {Get of casserole.
  2. {Take 2 of lamb shanks.
  3. {Get 1 of onion carrot stick celery.
  4. {Take 2 clove of garlic.
  5. {Get 2 tsp of olive oil.
  6. {Take 1 cup of red wine.
  7. {Get 1 can of crushed tomatoes.
  8. {Take 1 tsp of dried thyme.
  9. {Prepare 1 of salt pepper.
  10. {Get 2 cup of beef stock.
  11. {Get 1 cup of pearl barley.
  12. {Prepare 2 tsp of lemon zest.
  13. {Get 1 clove of garlic.
  14. {Get 2 tbsp of parsley.
  15. {Make ready 2 cup of water.

Instructions to make lamb shanks with red wine and barley:

  1. preheat oven to 150degrees c.
  2. in heavy based casserole on the stovetop add olive oil and brown lamb shanks.
  3. remove from pan and set aside.add finely chopped onion carrot and celery.
  4. brown vegies for five mins then add finely chopped garlic.
  5. deglaze pan with red wine then add tomatoes beef stock salt and pepper and thyme.
  6. return shanks to pan and add barley.
  7. once its simmering put lid on dish and put into oven for around 3 hours or until meat is falling off the bone.
  8. finely chop lemon zest parsey and garlic together to sprinkle on top of finished dish.

So that's going to wrap this up with this special food lamb shanks with red wine and barley recipe. Thanks so much for reading. I'm confident you can make this at home. There is gonna be more interesting food in home recipes coming up. Don't forget to save this page in your browser, and share it to your family, friends and colleague. Thanks again for reading. Go on get cooking!

Steps to Prepare Speedy Mosaic jelly cake

Steps to Prepare Speedy Mosaic jelly cake

Mosaic jelly cake. I have given the English explanation in each session so that all can watch and make this delicious dish for your kids and self toolike share and subscribe. Allow the jelly mixes to cool slightly, then place them in different ovenware containers. Before you prepare a jelly cake "Mosaic", you need to make a fruit jelly.

Mosaic jelly cake For the chocolate sauce of Biscuits Mosaic Cake, Start with putting the butter in a large skillet. Mawa Cake / Irani Mawa Cake with Cardamom and Roses. This jelly is also known as Stained Glass Jelly, Broken Glass Jelly or Jewel Jelly but I call it Mosaic Jelly because it just reminds me of.

Hello everybody, it is me again, Dan, welcome to my recipe site. Today, I will show you a way to make a distinctive dish, mosaic jelly cake. It is one of my favorites food recipes. For mine, I'm gonna make it a bit tasty. This is gonna smell and look delicious.

I have given the English explanation in each session so that all can watch and make this delicious dish for your kids and self toolike share and subscribe. Allow the jelly mixes to cool slightly, then place them in different ovenware containers. Before you prepare a jelly cake "Mosaic", you need to make a fruit jelly.

Mosaic jelly cake is one of the most favored of recent trending meals in the world. It's appreciated by millions every day. It's simple, it is fast, it tastes delicious. They're nice and they look fantastic. Mosaic jelly cake is something which I have loved my whole life.

To begin with this particular recipe, we have to prepare a few components. You can cook mosaic jelly cake using 7 ingredients and 5 steps. Here is how you cook it.

The ingredients needed to make Mosaic jelly cake:

  1. {Get of jelly box different color and flavor.
  2. {Get of boiling water.
  3. {Take of of can condensed milk.
  4. {Make ready of vanilla powder 1 tablespoon.
  5. {Take of vitamin D milk.
  6. {Get of unflavored gelatin.
  7. {Get of of hot water boiling.

Try it with chocolate sauce, vanilla ice cream, and fruit. The first recipe for today is a cake with a tendercurd cream. The name of the dish "Mosaic" speaks for itself: thanks to the fruit jelly, cut into large pieces, the dish is a. See more ideas about jelly hearts, jelly, heart cake.

Instructions to make Mosaic jelly cake:

  1. You need four containers spray with a little oil and each container of jelly said use 2 cups one cup of hot water and one cup cold water I’m going to use only one cup of hot water and each jelly box, make sure you melt the jelly in the water really good you mix it really good and then put it in the containers and refrigerated.
  2. Over medium heat add condensed milk vanilla 2 cups milk and mix till boil then let it cool.
  3. Using a pan spray with oil start cutting the jelly to cubes.
  4. Use the gelatin 3 box with 3/4 boiling water till it melt and leave it for 10 minutes then add to the milk and mix.
  5. Start putting the layers of jelly then milk then jelly then milk refrigerate for 12 hours.

TheJellyHearts - Where To Get Rainbow, Mosaic, Lychee Jelly Hearts Of All Types. How to make a simple jelly island cake that actually tastes really good! Lots of tips and tricks for Ingredients for making a jelly island cake. NOTE: This cake takes about three days to make so plan. I don't know how to bake a moon cake nor snow skin moon cake.

So that is going to wrap it up with this special food mosaic jelly cake recipe. Thanks so much for your time. I am confident that you can make this at home. There's gonna be more interesting food at home recipes coming up. Don't forget to bookmark this page in your browser, and share it to your loved ones, friends and colleague. Thanks again for reading. Go on get cooking!

Recipe of Perfect Spicy Lemon-Chicken Roll

Recipe of Perfect Spicy Lemon-Chicken Roll

Spicy Lemon-Chicken Roll.

Spicy Lemon-Chicken Roll

Hello everybody, hope you are having an amazing day today. Today, I will show you a way to prepare a distinctive dish, spicy lemon-chicken roll. One of my favorites. This time, I am going to make it a bit unique. This is gonna smell and look delicious.

Spicy Lemon-Chicken Roll is one of the most popular of current trending meals in the world. It is easy, it is fast, it tastes yummy. It is appreciated by millions every day. They are fine and they look wonderful. Spicy Lemon-Chicken Roll is something that I have loved my entire life.

To get started with this particular recipe, we have to first prepare a few components. You can cook spicy lemon-chicken roll using 21 ingredients and 8 steps. Here is how you cook that.

The ingredients needed to make Spicy Lemon-Chicken Roll:

  1. {Get 1/2 cup of small sized cube cut boneless chicken.
  2. {Take 1 of large egg.
  3. {Prepare 2 of medium sized chopped onions.
  4. {Make ready 2 of chopped green chillies.
  5. {Make ready 1 teaspoon of soya sauce.
  6. {Get 1 teaspoon of ginger-garlic paste.
  7. {Take as per taste of Salt.
  8. {Take as required of Oil for frying.
  9. {Take 1.5 cup of all purpose flour.
  10. {Take as required of Warm water as required.
  11. {Get 1 of small sized cucumber.
  12. {Make ready 1/2 teaspoon of black pepper.
  13. {Get 1/2 teaspoon of dry chilli flakes.
  14. {Prepare 1/2 teaspoon of turmeric powder.
  15. {Take 1/2 teaspoon of corn flour.
  16. {Prepare 3 tablespoons of mayonnaise.
  17. {Make ready 4 teaspoons of tomato sauce.
  18. {Prepare 2 teaspoons of lemon juice.
  19. {Prepare 2 teaspoons of powder milk.
  20. {Get 1/4 teaspoon of brown sugar.
  21. {Make ready as required of Ghee for roti.

Instructions to make Spicy Lemon-Chicken Roll:

  1. For bread : Take a bowl, put 1.5 cup all purpose flour and salt as required. Put 1 pinch of turmeric powder with 1/4 teaspoon brown sugar into it and give it a perfect mix..
  2. Now, take a pot, put some water as required for making dough and warm it on the stove. Put 1 teaspoon of lemon juice with 2 teaspoon powder milk into it and mix it. Put the warm water on the flour and make a perfect dough for bread. Make 3 standard size bread using roti maker with round shape..
  3. Now, fry all breads using ghee on the frypan to make it perfect flavoured. After that, stop the flame immediately. Roti is ready..
  4. For the filling : Put the all cube cut chicken into a bowl. Put 1/2 teaspoon corn flour with salt as required and soya sauce into it. Put 1 teaspoon tomato sauce with 1 teaspoon lemon juice. Put black pepper as required with ginger-garlic paste and 1/2 teaspoon turmeric powder into it. Give it a perfect mix. Keep it aside 1/2 an hour for marination. Then fry it using oil on frypan and stop the flame. Chicken is ready..
  5. Now, take a frypan, put some oil and put some chopped onions with chopped green chillies with salt as required into it and fry it. Put 1 egg into it and make perfect egg crumble using spatula. Stop the flame. Egg is ready..
  6. Chop the cucumber into small sizes for the roll..
  7. For the final arrangements: Now, take one roti and spread some mayonnaise on the whole top side of the roti. Spread some chilli flakes with tomato sauce. Then put some chopped cucumber in one corner of the roti. Put chopped onions beside the cucumber. Put egg crumble and fried chicken beside onions. Now fold it from one corner carefully and make a perfect roll..
  8. Prepare all the roll using the same process. When all roll is ready, Garnish it with sauces and enjoy. Stay safe and Take Love from Bangladesh..

So that is going to wrap this up with this special food spicy lemon-chicken roll recipe. Thank you very much for reading. I am confident that you will make this at home. There's gonna be interesting food at home recipes coming up. Remember to bookmark this page on your browser, and share it to your family, friends and colleague. Thanks again for reading. Go on get cooking!

How to Prepare Super Quick Homemade Sweet Potato Alfredo Tortellini
with Kielbasa

How to Prepare Super Quick Homemade Sweet Potato Alfredo Tortellini with Kielbasa

Sweet Potato Alfredo Tortellini with Kielbasa.

Sweet Potato Alfredo Tortellini with Kielbasa

Hey everyone, I hope you are having an amazing day today. Today, I will show you a way to make a special dish, sweet potato alfredo tortellini with kielbasa. One of my favorites. For mine, I will make it a bit unique. This will be really delicious.

Sweet Potato Alfredo Tortellini with Kielbasa is one of the most popular of recent trending foods in the world. It is simple, it is fast, it tastes delicious. It is appreciated by millions daily. They're nice and they look fantastic. Sweet Potato Alfredo Tortellini with Kielbasa is something that I've loved my whole life.

To begin with this recipe, we have to prepare a few ingredients. You can have sweet potato alfredo tortellini with kielbasa using 11 ingredients and 8 steps. Here is how you cook it.

The ingredients needed to make Sweet Potato Alfredo Tortellini with Kielbasa:

  1. {Prepare 1 packages of cheese toretellini.
  2. {Prepare 1 of sweet potato.
  3. {Make ready 1 lb of spinach.
  4. {Get 1 pints of Grape tomatoes.
  5. {Make ready 2 tbsp of Brown butter.
  6. {Take 2 tbsp of Flour.
  7. {Take 1 cup of Milk.
  8. {Take 1/2 cup of Parmesan cheese.
  9. {Take 1 of as needed Salt and pepper.
  10. {Take 1/2 tsp of Cayenne pepper.
  11. {Make ready 1 packages of Kielbasa (turkey or beef).

Steps to make Sweet Potato Alfredo Tortellini with Kielbasa:

  1. Peel and cut sweet potato into cubes. Add to boiling water and cook until fork tender. Add to blender until smooth..
  2. Boil water and add tortellini, cook according to package directions..
  3. Melt butter in medium sauce pan and add flour to form a rue..
  4. Add milk and wish over medium low heat until thickened..
  5. Cut up kielbasa and sauté in olive oil until browned over medium heat..
  6. Add blended sweet potato and cheese and stir, if sauce is too thick add water to thin out. Season with salt, pepper, and cayenne. Leave on low heat stirring occasionally..
  7. Add grape tomatoes and spinach to kielbasa and lower heat. Cook until spinach is wilted..
  8. Add sauce to kielbasa mixture and combine. Spoon over tortellini and garnish with cheese as desired..

So that is going to wrap it up with this special food sweet potato alfredo tortellini with kielbasa recipe. Thanks so much for your time. I am sure that you will make this at home. There is gonna be interesting food in home recipes coming up. Remember to save this page on your browser, and share it to your family, friends and colleague. Thank you for reading. Go on get cooking!

How to Prepare Homemade Nutella hot chocolate

How to Prepare Homemade Nutella hot chocolate

Nutella hot chocolate. Nutella hot chocolate is a tasty twist on the classic hot chocolate. It's chocolatey, creamy, and nutty - all thanks to a simple combo of milk simmered with the best homemade Nutella. Recipe by GoKittenGo. it's so simple, but delicious! i was very impressed with the outcome; the hot chocolate is so creamy and rich!!

Nutella hot chocolate Hazelnut spread and chocolate are a perfect pair and the addition of Nutella in this hot chocolate recipe will surely satisfy. Delicious Nutella Hot Chocolate Recipe perfect for a cold winter day! My dear Husband is a Nutella freak!

Hello everybody, hope you're having an incredible day today. Today, I will show you a way to make a distinctive dish, nutella hot chocolate. One of my favorites. This time, I'm gonna make it a little bit unique. This will be really delicious.

Nutella hot chocolate is one of the most popular of recent trending foods in the world. It is easy, it's fast, it tastes yummy. It's appreciated by millions daily. Nutella hot chocolate is something that I have loved my entire life. They are fine and they look wonderful.

Nutella hot chocolate is a tasty twist on the classic hot chocolate. It's chocolatey, creamy, and nutty - all thanks to a simple combo of milk simmered with the best homemade Nutella. Recipe by GoKittenGo. it's so simple, but delicious! i was very impressed with the outcome; the hot chocolate is so creamy and rich!!

To begin with this recipe, we have to first prepare a few components. You can cook nutella hot chocolate using 3 ingredients and 4 steps. Here is how you cook that.

The ingredients needed to make Nutella hot chocolate:

  1. {Get of Nutella.
  2. {Prepare of milk.
  3. {Get of desired topping (spray cream and sprinkles).

This Nutella Hot Chocolate is dessert worthy. This Nutella Hot Chocolate can be made in the crockpot or on the stove. You can make a little or triple the batch for your gang. Chocolate-hazelnut spread and hazelnut liqueur give hot chocolate a rich and decadent twist, perfect for the holiday season.

Instructions to make Nutella hot chocolate:

  1. Add 1/3 cup of milk in a small saucepan and 3 tablespoons of Nutella. Put on medium heat..
  2. Whisk them together until blended.
  3. And the remaining milk into the saucepan. Increase heat to medium-high. Whisk again until hot and frothy..
  4. Pour into ur favourite mug and enjoy! You may also add spray cream on top..

Nutella Hot Chocolate - a rich, indulgent sipping chocolate with Nutella mixed right in! Top it with whipped cream and hazelnuts for the ultimate treat. When it comes to hot chocolate. Super chocolatey, super decadent, super… healthy. This Nutella Hot Chocolate would be a great addition to breakfast on Christmas morning and of course a great way to keep warm.

So that's going to wrap it up for this special food nutella hot chocolate recipe. Thanks so much for your time. I am sure you will make this at home. There's gonna be interesting food at home recipes coming up. Don't forget to bookmark this page in your browser, and share it to your loved ones, friends and colleague. Thank you for reading. Go on get cooking!

Step-by-Step Guide to Make Ultimate lazy lasagna

Step-by-Step Guide to Make Ultimate lazy lasagna

lazy lasagna.

lazy lasagna

Hello everybody, it's John, welcome to our recipe site. Today, we're going to prepare a special dish, lazy lasagna. It is one of my favorites food recipes. For mine, I am going to make it a bit unique. This is gonna smell and look delicious.

lazy lasagna is one of the most well liked of current trending meals in the world. It's easy, it's quick, it tastes delicious. It's appreciated by millions every day. lazy lasagna is something which I've loved my whole life. They're fine and they look fantastic.

To get started with this recipe, we must prepare a few ingredients. You can cook lazy lasagna using 7 ingredients and 7 steps. Here is how you cook it.

The ingredients needed to make lazy lasagna:

  1. {Take of hamburger.
  2. {Prepare of spinach.
  3. {Take of mushrooms.
  4. {Prepare of cottage cheese.
  5. {Make ready of mozza cheese.
  6. {Get of lasgna hamburger helper.
  7. {Make ready of stewed tomatoes.

Instructions to make lazy lasagna:

  1. brown hamburger in a pan.
  2. add mushrooms and stewed tomatoes.
  3. add box of lasagna helper and cook as directed.
  4. add spinach and stir.
  5. add cottage cheese.
  6. stir and cook until bubbly.
  7. sprinkle mozza cheese and heat until melted.

So that is going to wrap it up for this exceptional food lazy lasagna recipe. Thank you very much for your time. I'm sure that you can make this at home. There is gonna be more interesting food at home recipes coming up. Remember to bookmark this page on your browser, and share it to your loved ones, colleague and friends. Thank you for reading. Go on get cooking!

Simple Way to Make Homemade Vanilla Chiffon Cake with Whipped Cream and
Strawberries

Simple Way to Make Homemade Vanilla Chiffon Cake with Whipped Cream and Strawberries

Vanilla Chiffon Cake with Whipped Cream and Strawberries.

Vanilla Chiffon Cake with Whipped Cream and Strawberries

Hey everyone, I hope you're having an incredible day today. Today, I will show you a way to prepare a special dish, vanilla chiffon cake with whipped cream and strawberries. One of my favorites. For mine, I am going to make it a little bit tasty. This is gonna smell and look delicious.

Vanilla Chiffon Cake with Whipped Cream and Strawberries is one of the most well liked of recent trending meals on earth. It is appreciated by millions daily. It is easy, it's quick, it tastes yummy. Vanilla Chiffon Cake with Whipped Cream and Strawberries is something which I have loved my entire life. They're nice and they look wonderful.

To get started with this recipe, we must first prepare a few ingredients. You can cook vanilla chiffon cake with whipped cream and strawberries using 22 ingredients and 14 steps. Here is how you can achieve it.

The ingredients needed to make Vanilla Chiffon Cake with Whipped Cream and Strawberries:

  1. {Prepare of FOR CAKE.
  2. {Make ready of cake flour.
  3. {Take of granulated sugar.
  4. {Get of baking powder.
  5. {Take of salt.
  6. {Prepare of egg yolks.
  7. {Get of water.
  8. {Make ready of oil, vegetable, canola or any flavorless oil.
  9. {Get of vanilla extract.
  10. {Take of egg whites.
  11. {Take of cream of tartar.
  12. {Take of additional granulated sugar for egg whites.
  13. {Take of FOR WHIPPED CREAM FROSTING AND FILLING.
  14. {Take of heavy whipping cream.
  15. {Take of confectioners sugar.
  16. {Prepare of vanilla extract.
  17. {Make ready of unflavored gelatin.
  18. {Get of cold water.
  19. {Take of FOR STRAWBERRIES.
  20. {Prepare of fresh strawberries.
  21. {Take of FOR GARNISH.
  22. {Make ready of colored sprinkes.

Steps to make Vanilla Chiffon Cake with Whipped Cream and Strawberries:

  1. Preheat oven to 325. Have a 10 inch ungreased tube pan ready to fill..
  2. Combine in a large bowl, flour, 1 1/4 cups sugar, baking powder and salt, whisk well until light and combined..
  3. In another bowl beat until smooth, egg yolks, water, oil, and vanilla. Stir in the flour mixture until smooth..
  4. In another large bowl beat on medium speed the egg whites and cream of tarter gradually add beating on high the additional 1/4 cup sugar, Beat until stiff peaks.
  5. Using a rubber spatula fold egg whites into egg yolk mixture in 3 stages, until blended, do not deflate..
  6. Scrape the batter into pan and spread evenly. Bake until top springs back when lightly pressed and a toothpick comes out clean about 55 to 65 minutes..
  7. Let cool at least 1 1/2 hours upside down. Slide a slim knife around the cake to detach cake..
  8. FOR WHIPPED CREAM.
  9. In a small heat proof bowl soften gelatin in cold water for 1 minute. Place bowl in a simmering skillet of hot water until clear, just a minute or 2 remove from heat, but do this while whipping cream as you want the gelatin liquid when adding to cream..
  10. Whip cream in a chilled bowl until soft peaks add sugar, vanilla and liquid gelatin, beat until stiff peaks. The gelatin will stabalize the cream so it will stay ftesh and fluffy a couple of days..
  11. TO ASSEMBLE CAKE.
  12. Carefully cut cake in half to form two layers. Spreag a layer of whipped cream on bottom layer, top with thin slices of unsweetened strawberries. Put top layer on and frost entire cake with remaining whipped cream..
  13. Decorate top with halfed unsweetened berries and sprinkles. There will be extra stawberries, sweeten these with a bit of sugar if desired and serve extra with cake. The reason NOT to sweeten the strawberries for the cake is that they would add to much moisture..
  14. Keep cake refrigerated.

So that is going to wrap this up with this special food vanilla chiffon cake with whipped cream and strawberries recipe. Thanks so much for reading. I'm confident you will make this at home. There's gonna be interesting food in home recipes coming up. Remember to save this page on your browser, and share it to your loved ones, friends and colleague. Thank you for reading. Go on get cooking!

How to Make Homemade 3 colour Rice With Wings

How to Make Homemade 3 colour Rice With Wings

3 colour Rice With Wings.

3 colour Rice With Wings

Hello everybody, I hope you're having an incredible day today. Today, I'm gonna show you how to prepare a special dish, 3 colour rice with wings. One of my favorites. This time, I'm gonna make it a bit tasty. This is gonna smell and look delicious.

3 colour Rice With Wings is one of the most popular of recent trending meals in the world. It is enjoyed by millions every day. It is simple, it is quick, it tastes delicious. They are nice and they look fantastic. 3 colour Rice With Wings is something that I've loved my entire life.

To get started with this particular recipe, we must first prepare a few components. You can have 3 colour rice with wings using 2 ingredients and 3 steps. Here is how you can achieve that.

The ingredients needed to make 3 colour Rice With Wings:

  1. {Take of Achari chaana pulao (see recipe).
  2. {Get of Fry crispy chicken wings (see recipe).

Steps to make 3 colour Rice With Wings:

  1. Take a Karahi add oil and fry the chicken wings..
  2. Cook the white colour chickpeas, add green mango pickle and green chillies and place in steam (dum) for 15 minutes on low heat.
  3. Serve the white chickpeas rice with green mango pickle and red chicken wings hot and enjoy..

So that is going to wrap it up with this exceptional food 3 colour rice with wings recipe. Thanks so much for reading. I'm confident that you will make this at home. There is gonna be more interesting food at home recipes coming up. Don't forget to save this page in your browser, and share it to your family, friends and colleague. Thank you for reading. Go on get cooking!

Steps to Prepare Any-night-of-the-week Spicy Shrimp Jambalaya

Steps to Prepare Any-night-of-the-week Spicy Shrimp Jambalaya

Spicy Shrimp Jambalaya.

Spicy Shrimp Jambalaya

Hello everybody, it is John, welcome to our recipe page. Today, we're going to make a distinctive dish, spicy shrimp jambalaya. One of my favorites. This time, I'm gonna make it a little bit tasty. This will be really delicious.

Spicy Shrimp Jambalaya is one of the most popular of current trending meals on earth. It is easy, it is quick, it tastes yummy. It is appreciated by millions daily. Spicy Shrimp Jambalaya is something which I have loved my entire life. They are nice and they look fantastic.

To get started with this particular recipe, we must first prepare a few ingredients. You can cook spicy shrimp jambalaya using 9 ingredients and 15 steps. Here is how you can achieve that.

The ingredients needed to make Spicy Shrimp Jambalaya:

  1. {Prepare 1 bag of Shrimp.
  2. {Make ready of Jambalaya mix.
  3. {Make ready 3-5 of Jalapeños peppers.
  4. {Prepare 1-3 of of each Red,Yellow,Green peppers.
  5. {Take 1/2 of Onion.
  6. {Make ready 1 tbs of Vegetable oil.
  7. {Make ready of Baton Rouge Spicy Seasonings.
  8. {Make ready of Creole Seasonings.
  9. {Make ready 1-2 cans of Diced tomatos.

Instructions to make Spicy Shrimp Jambalaya:

  1. What you need!.
  2. Wash vegetables, then chop..
  3. Add 1 tbs oil to pan heat n then add in vegetables..
  4. Add 1/2 tsp Baton Rouge seasons. 1/4 tsb Creole Season Let simmer..
  5. In a separate pan perpare the Jambalaya mix according to the directions on box..
  6. When vegetable oil and water boiled add in Jambalaya mix. Stir until soft..
  7. Add the vegetables to the soft Jambalaya mix. (Resuse this pan for shrimp.).
  8. Thaw shrimp according to directions on bag.
  9. Lay your thawed shrimp out and remove tail. Add seasoning a pinch of salt and sprinkle of Baton Rouge seasons..
  10. Cook shrimp in a hot pan with oil. A touch of golden color..
  11. On low heat add diced tomatoes to crock pot..
  12. Add in the shrimp to Jambalaya. Stir.
  13. Add Shrimp Jambalaya to crock pot. Let flavors come together on low heat..
  14. Cover let simmer. To thicken leave uncovered..
  15. .

So that is going to wrap it up for this exceptional food spicy shrimp jambalaya recipe. Thank you very much for reading. I am confident you can make this at home. There is gonna be interesting food at home recipes coming up. Remember to bookmark this page on your browser, and share it to your loved ones, colleague and friends. Thank you for reading. Go on get cooking!

Recipe of Super Quick Homemade Rajasthani panch mel dal

Recipe of Super Quick Homemade Rajasthani panch mel dal

Rajasthani panch mel dal.

Rajasthani panch mel dal

Hey everyone, it's Drew, welcome to our recipe site. Today, we're going to make a special dish, rajasthani panch mel dal. It is one of my favorites food recipes. This time, I will make it a bit unique. This is gonna smell and look delicious.

Rajasthani panch mel dal is one of the most well liked of recent trending foods in the world. It's enjoyed by millions daily. It's simple, it's quick, it tastes delicious. They're fine and they look wonderful. Rajasthani panch mel dal is something that I have loved my entire life.

To get started with this particular recipe, we have to first prepare a few components. You can have rajasthani panch mel dal using 20 ingredients and 7 steps. Here is how you can achieve it.

The ingredients needed to make Rajasthani panch mel dal:

  1. {Take of moong dal.
  2. {Prepare of toor dal.
  3. {Take of masoor dal.
  4. {Take of chana dal.
  5. {Take of urad dal.
  6. {Get of ghee or oil.
  7. {Make ready of dried red chilli.
  8. {Get of cumin seeds.
  9. {Prepare of mustard seeds.
  10. {Make ready of bay leaves.
  11. {Make ready of green chilli split.
  12. {Get of ginger-garlic-green chilli paste.
  13. {Prepare of coriander powder.
  14. {Get of cumin powder.
  15. {Get of garam masala powder.
  16. {Make ready of chopped coriander leaves.
  17. {Make ready of Salt as per taste.
  18. {Prepare of turmeric powder.
  19. {Make ready of medium sized onion finely chopped.
  20. {Get of small tomato chopped.

Steps to make Rajasthani panch mel dal:

  1. Mix and Wash the dal properly.Pressure cook the dal for 2 whistle on medium flame with little salt and a slit green chilli..
  2. In a small bowl take the ginger- garlic and green chilli paste, cumin powder, coriander powder, turmeric powder and mix with 1/2 cup of hot water. Keep it aside..
  3. In a kadai heat 2 tblspn ghee or oil. Add 1 t spn of cumin seeds, 1 t spn of musterd seeds and two dried red chilli and bay leaves. Let it splutter. Add chopped onion. Fried a little then add the chopped tomato..
  4. Now add the pre mixed spices and cook on low to medium heat till the raw smell gone. When the tomatoes become soften and you can see the oil releasing from the side add the boiled dal. Add water and salt as required and cook it for 5 to 7 mins on medium flame..
  5. Now add garam masala powder, chopped coriander leaves and switch off the flame. You also can add crushed kasouri methi..
  6. Now for heat 2 tblspn ghee with 2 dried red chilli and 1 tspn cumin seeds. Add this onto the dal. It will enhance the flavour but you can skip this step..
  7. Finally your panchmel dal is ready to serve..

So that's going to wrap it up with this exceptional food rajasthani panch mel dal recipe. Thank you very much for reading. I'm sure that you will make this at home. There is gonna be interesting food at home recipes coming up. Don't forget to bookmark this page in your browser, and share it to your family, friends and colleague. Thanks again for reading. Go on get cooking!

Recipe of Homemade Thai broccoli soup

Recipe of Homemade Thai broccoli soup

Thai broccoli soup.

Thai broccoli soup

Hello everybody, it's Brad, welcome to our recipe site. Today, I'm gonna show you how to make a distinctive dish, thai broccoli soup. It is one of my favorites. For mine, I'm gonna make it a bit unique. This will be really delicious.

Thai broccoli soup is one of the most favored of current trending foods on earth. It is easy, it's fast, it tastes yummy. It is enjoyed by millions every day. They are nice and they look wonderful. Thai broccoli soup is something that I've loved my entire life.

To begin with this particular recipe, we have to prepare a few components. You can have thai broccoli soup using 13 ingredients and 3 steps. Here is how you can achieve it.

The ingredients needed to make Thai broccoli soup:

  1. {Make ready 3 cup of broccoli florets.
  2. {Prepare 1 of chopped onion.
  3. {Make ready 3 of gloves of garlic chopped.
  4. {Make ready 1 can of coconut milk.
  5. {Make ready 2 cups of chicken broth.
  6. {Make ready of Salt.
  7. {Take of Pepper.
  8. {Make ready 1 tablespoon of cornstarch.
  9. {Take 1/4 cup of cilantro dry.
  10. {Make ready 1/2 teaspoon of turmeric.
  11. {Make ready 1/2 teaspoon of ginger dry.
  12. {Get 1/8 teaspoon of nutmeg fresh.
  13. {Take 2 teaspoon of olive oil.

Steps to make Thai broccoli soup:

  1. Over medium heat salute onion with oil cook for few minutes then add broccoli and garlic and cook for 10 minutes on law medium heat.
  2. Add chicken broth and spices and cook for another 10 minutes then add the milk use the blinder to smooth the soup.
  3. To thicken the soup I used one tablespoon of cornstarch with 1/4 cup cold broth and mix well then add to soup and cook for few minutes enjoy.

So that's going to wrap this up for this special food thai broccoli soup recipe. Thanks so much for your time. I'm sure that you can make this at home. There is gonna be more interesting food in home recipes coming up. Don't forget to bookmark this page on your browser, and share it to your family, colleague and friends. Thanks again for reading. Go on get cooking!

Easiest Way to Make Favorite Paneer lazabab kabab

Easiest Way to Make Favorite Paneer lazabab kabab

Paneer lazabab kabab.

Paneer lazabab kabab

Hello everybody, hope you are having an incredible day today. Today, we're going to make a distinctive dish, paneer lazabab kabab. One of my favorites. For mine, I'm gonna make it a little bit tasty. This will be really delicious.

Paneer lazabab kabab is one of the most favored of recent trending meals on earth. It is enjoyed by millions every day. It's easy, it's quick, it tastes delicious. Paneer lazabab kabab is something that I have loved my whole life. They're nice and they look fantastic.

To get started with this particular recipe, we must prepare a few ingredients. You can cook paneer lazabab kabab using 7 ingredients and 2 steps. Here is how you cook it.

The ingredients needed to make Paneer lazabab kabab:

  1. {Get 50 gm of Paneer.
  2. {Make ready 3 tablespoon of Curd.
  3. {Make ready 1 teaspoon of Cumin powder.
  4. {Get 2 table spoon of Kabab masala.
  5. {Prepare 1 table spoon of Butter.
  6. {Prepare 1 of small size onion.
  7. {Make ready of Salt as per taste.

Instructions to make Paneer lazabab kabab:

  1. Marinate the paneer with curd, cumin powder, Kabab masala for at least 5 hours. I use non-stick grill pan.. Bead the paneer pieces with the skewers now Heat the pan and brush it with butter.. fry the marinated paneer pieces..
  2. While one side of the paneer pieces seems to be brown in colour flip it to other side and let it to cook.. Whole process is done in a low flame.. Paneer lazabab Kabab is ready to serve.

So that is going to wrap this up for this special food paneer lazabab kabab recipe. Thanks so much for your time. I'm sure that you will make this at home. There's gonna be more interesting food in home recipes coming up. Don't forget to bookmark this page on your browser, and share it to your family, friends and colleague. Thanks again for reading. Go on get cooking!

Recipe of Any-night-of-the-week Dum Biryani

Recipe of Any-night-of-the-week Dum Biryani

Dum Biryani.

Dum Biryani

Hey everyone, I hope you are having an incredible day today. Today, I will show you a way to prepare a special dish, dum biryani. It is one of my favorites. For mine, I will make it a little bit tasty. This is gonna smell and look delicious.

Dum Biryani is one of the most well liked of recent trending foods in the world. It is simple, it is quick, it tastes yummy. It's appreciated by millions every day. Dum Biryani is something which I have loved my whole life. They are fine and they look fantastic.

To get started with this particular recipe, we have to first prepare a few ingredients. You can cook dum biryani using 25 ingredients and 33 steps. Here is how you can achieve it.

The ingredients needed to make Dum Biryani:

  1. {Take 2 kg of Mutton.
  2. {Take 2 kg of Basmati Rice - Long Grain.
  3. {Prepare 250 ml of Oil.
  4. {Make ready 10 of Green Chillies.
  5. {Take 4 of Onion.
  6. {Prepare 500 ml of Curd.
  7. {Get 4 of Lime.
  8. {Get 250 grams of Wheat Flout.
  9. {Take 250 grams of Ginger Garlic Paste.
  10. {Take of Spices.
  11. {Take 150 grams of Chilli Powder.
  12. {Take 50 grams of Turmeric Powder.
  13. {Make ready 100 grams of Dhana Jeera Powder.
  14. {Make ready 100 grams of Garam Masala.
  15. {Prepare 10 of Elaichi.
  16. {Get 10 of Bay Leaves.
  17. {Prepare 3 of Dalchini.
  18. {Prepare 10 of Cloves.
  19. {Take 100 grams of Salt.
  20. {Get 1 of Food Color Orange.
  21. {Get 20 grams of Motha Jeera.
  22. {Get of Green Items.
  23. {Prepare 1 of Coriander.
  24. {Take 1 of Green Papaya Small.
  25. {Take 1 of Mint.

Steps to make Dum Biryani:

  1. Wash meat with turmeric.
  2. add dry spices in meat.
  3. Add 2 spoon salt.
  4. Add 2 big spoons ginger garlic paste.
  5. mix well with the meat and close the lid and keep aside for 15 min.
  6. Chop onions in length.
  7. Chop Green chillies in 2 portion.
  8. Grind coriander, mint & papaya.
  9. Deep fry onions.
  10. add green items paste to meat and mix well. add curd occasionally.
  11. Add chopped green chillies.
  12. mix well & taste the preparation.
  13. add deep fried onions on the top of meat mixture.
  14. marinate for half hour. ensure to close the lid.
  15. wash rice.
  16. heat half bowl of water.
  17. add 2-3 tbs oil, 2 tbs salt, 5 cloves & elaichi, bay leaves, dalchini, motha jeera.
  18. boil water for few minutes.
  19. add rice and cook for 2-3 min , check its half cooked.
  20. remove all excess water and keep the rice in another bowl.
  21. add remaining oil from onions into the meat and mix well.
  22. squeeze lime juice in bowl and add food color.
  23. add oil to cover the base of main bowl.
  24. Add chopped onions to the base.
  25. add meat mixture.
  26. add half cooked rice.
  27. add colored lime.
  28. Add some oil in rice.
  29. close the lid with help of dough.
  30. heat on full flame for 10 min.
  31. heat on slow flame for 40 min.
  32. turn off gas and wait for 15 min to cool off.
  33. done!.

So that is going to wrap this up for this exceptional food dum biryani recipe. Thanks so much for reading. I am confident that you can make this at home. There is gonna be more interesting food in home recipes coming up. Don't forget to save this page on your browser, and share it to your loved ones, friends and colleague. Thanks again for reading. Go on get cooking!

Recipe of Homemade French Home Apple Tart

Recipe of Homemade French Home Apple Tart

French Home Apple Tart.

French Home Apple Tart

Hello everybody, it's John, welcome to our recipe page. Today, I will show you a way to make a distinctive dish, french home apple tart. It is one of my favorites food recipes. This time, I am going to make it a little bit tasty. This will be really delicious.

French Home Apple Tart is one of the most well liked of recent trending meals on earth. It's enjoyed by millions every day. It's simple, it's fast, it tastes delicious. French Home Apple Tart is something which I have loved my whole life. They're fine and they look wonderful.

To begin with this recipe, we have to first prepare a few components. You can have french home apple tart using 10 ingredients and 8 steps. Here is how you cook that.

The ingredients needed to make French Home Apple Tart:

  1. {Make ready of Ingredients.
  2. {Prepare of unbleached white flour.
  3. {Prepare of whole wheat flour.
  4. {Take of salt.
  5. {Prepare of water.
  6. {Take of unsalted butter.
  7. {Prepare of large Granny Smith apples or any available apples, peeled, quartered, cored and cut into thin slices.
  8. {Prepare of recipe for crème pâtissière, opt..
  9. {Take of apple sauce, opt..
  10. {Prepare of brown sugar.

Instructions to make French Home Apple Tart:

  1. Mix flours and salt.
  2. Cut in butter into flour in very small pieces. Mix well and finish with (clean) fingers in order to obtain the appearance of crumbs..
  3. Add water, a little at a time, and stop when play-dough consistency is achieved..
  4. Cover the bowl with plate or towel, and let sit for an hour if possible..
  5. Roll out the dough. Use an oiled tart dish if available. A pie dish will do, but you will need creme pâtissière or apple sauce at the bottom since the tart will be deeper..
  6. Opt: Pour 1/2" crème pâtissière or apple sauce at the bottom. Arrange the apple slices on top, from the outer edges toward the center, cutting the slices in halves to finish up. I filled in any gap with small pieces..
  7. Sprinkle some brown sugar on top..
  8. Bake at 380°F , 45 min to an hour, until golden-brown..

So that's going to wrap this up for this special food french home apple tart recipe. Thanks so much for your time. I am confident you will make this at home. There is gonna be interesting food in home recipes coming up. Don't forget to save this page on your browser, and share it to your family, friends and colleague. Thank you for reading. Go on get cooking!

Recipe of Ultimate Multigrain Litti Chokha

Recipe of Ultimate Multigrain Litti Chokha

Multigrain Litti Chokha.

Multigrain Litti Chokha

Hey everyone, I hope you are having an amazing day today. Today, we're going to prepare a special dish, multigrain litti chokha. It is one of my favorites food recipes. This time, I'm gonna make it a bit tasty. This is gonna smell and look delicious.

Multigrain Litti Chokha is one of the most well liked of current trending foods on earth. It's appreciated by millions every day. It's simple, it's quick, it tastes yummy. Multigrain Litti Chokha is something which I have loved my entire life. They are fine and they look wonderful.

To begin with this particular recipe, we must first prepare a few ingredients. You can have multigrain litti chokha using 18 ingredients and 10 steps. Here is how you cook it.

The ingredients needed to make Multigrain Litti Chokha:

  1. {Prepare 1/2 cup of wheat flour.
  2. {Make ready 1/2 cup of millet flour.
  3. {Get 1/2 cup of jowar flour.
  4. {Get 12 cup of maize flour.
  5. {Prepare 1 cup of sattu made of roasted gram flour and barley.
  6. {Get 2 spoons of mustard oil.
  7. {Get 2 of brinjals roasted.
  8. {Make ready 2 of potatoes boiled.
  9. {Prepare 2 of roasted tomatoes.
  10. {Take 5 of green chillies.
  11. {Get 5 pods of garlic.
  12. {Take 1 inch of ginger.
  13. {Take Handful of Coriander leaves.
  14. {Prepare As per taste of Salt.
  15. {Prepare 1 tsp of Red chilli powder.
  16. {Prepare 3 of Onions, medium.
  17. {Prepare 1/2 tsp of Ajwain.
  18. {Make ready As required of Ghee.

Steps to make Multigrain Litti Chokha:

  1. Mix all the flours and add 1/2 spoon of ajwain and salt to taste. Add 2 spoons of ghee..
  2. Now knead the flour with water and keep aside..
  3. Roast the brinjals on the gas flame.Peel the skin after roasting and mash it..
  4. Now mash the boiled potatoes and add them to the mashed brinjals..
  5. Add the finely chopped green chillies, coriander, onion and 4pods of garlic..
  6. Add salt, 1spoon of mustard oil and mashed roasted tomatoes..
  7. Mix the chokha and keep aside..
  8. Mix the roasted gram flour and barley sattu, salt, ginger garlic chilli paste, red chilli powder, 1spoon of mustard oil and 1lemon juice and ajwain. Add finely chopped onion. Add finely chopped Coriander. Keep aside..
  9. Now take the dough add the filling of sattu and make balls or littis..
  10. Now bake these littis in barbeque or in a gas tandoor or grill in the OTG. After all the littis are baked dip them in ghee and serve with chokha..

So that's going to wrap it up for this special food multigrain litti chokha recipe. Thanks so much for your time. I'm confident that you can make this at home. There's gonna be more interesting food at home recipes coming up. Remember to save this page on your browser, and share it to your family, colleague and friends. Thanks again for reading. Go on get cooking!

Steps to Make Homemade Easy peasy apple crisp!

Steps to Make Homemade Easy peasy apple crisp!

Easy peasy apple crisp!.

Easy peasy apple crisp!

Hello everybody, I hope you're having an amazing day today. Today, we're going to prepare a distinctive dish, easy peasy apple crisp!. One of my favorites food recipes. For mine, I am going to make it a little bit tasty. This is gonna smell and look delicious.

Easy peasy apple crisp! is one of the most favored of current trending foods in the world. It is simple, it's quick, it tastes yummy. It's enjoyed by millions every day. Easy peasy apple crisp! is something that I've loved my entire life. They're nice and they look wonderful.

To get started with this recipe, we have to first prepare a few components. You can have easy peasy apple crisp! using 9 ingredients and 3 steps. Here is how you cook it.

The ingredients needed to make Easy peasy apple crisp!:

  1. {Make ready of pealed & sliced apples (about 4 large apples - a mix of granny smith and ambrosia are delicious!).
  2. {Prepare of all-purpose flour.
  3. {Make ready of honey.
  4. {Prepare of butter or margarine.
  5. {Get of packed brown sugar.
  6. {Prepare of all-purpose flour.
  7. {Take of quick cooking oats.
  8. {Take of ground cinnamon.
  9. {Make ready of ground nutmeg.

Instructions to make Easy peasy apple crisp!:

  1. Combine apples and 1-1/2 tbls flour in a round baking dish. Mix honey and set aside..
  2. Microwave butter on high in glass mixing bowl for 15 to 30 seconds. Mix in remaining ingredients with fork until crumbly. Sprinkle over apples..
  3. Bake at 350degreesF for 50 to 60 minutes..

So that's going to wrap it up with this exceptional food easy peasy apple crisp! recipe. Thanks so much for reading. I'm confident that you can make this at home. There's gonna be interesting food in home recipes coming up. Remember to save this page in your browser, and share it to your family, colleague and friends. Thank you for reading. Go on get cooking!

Simple Way to Make Quick Carrot Salad

Simple Way to Make Quick Carrot Salad

Carrot Salad.

Carrot Salad

Hey everyone, I hope you're having an amazing day today. Today, I'm gonna show you how to prepare a special dish, carrot salad. One of my favorites. For mine, I will make it a bit tasty. This is gonna smell and look delicious.

Carrot Salad is one of the most well liked of current trending meals on earth. It is enjoyed by millions every day. It's simple, it's quick, it tastes yummy. Carrot Salad is something which I've loved my entire life. They're fine and they look wonderful.

To begin with this particular recipe, we must first prepare a few components. You can cook carrot salad using 5 ingredients and 4 steps. Here is how you can achieve that.

The ingredients needed to make Carrot Salad:

  1. {Prepare 3 of carrots.
  2. {Take 1 of green apple.
  3. {Take 1 of red apple.
  4. {Get of Mixed fruit yoghurt.
  5. {Prepare of Mayonnaise (amount of your choice).

Instructions to make Carrot Salad:

  1. Wash carrots and grate them. Chop apples into cubes.
  2. Dress with yoghurt and mayonnaise in a big bowl..
  3. Chill before serving.
  4. Very easy!!.

So that is going to wrap it up for this exceptional food carrot salad recipe. Thanks so much for your time. I am sure you will make this at home. There is gonna be more interesting food in home recipes coming up. Don't forget to bookmark this page on your browser, and share it to your loved ones, colleague and friends. Thanks again for reading. Go on get cooking!

Recipe of Homemade Salad & dip

Recipe of Homemade Salad & dip

Salad & dip.

Salad & dip

Hello everybody, I hope you're having an incredible day today. Today, I'm gonna show you how to prepare a special dish, salad & dip. One of my favorites. This time, I'm gonna make it a bit unique. This is gonna smell and look delicious.

Salad & dip is one of the most popular of recent trending meals on earth. It's simple, it's quick, it tastes delicious. It's enjoyed by millions every day. They're fine and they look wonderful. Salad & dip is something which I have loved my whole life.

To begin with this particular recipe, we have to prepare a few components. You can have salad & dip using 7 ingredients and 4 steps. Here is how you can achieve that.

The ingredients needed to make Salad & dip:

  1. {Prepare 1 tbsp of Mustard sauce.
  2. {Get 2 tbsp of hung curd.
  3. {Take 1 tbsp of cream cheese.
  4. {Get 1 of small onion very finely chopped.
  5. {Prepare 2 tsp of grated carrots.
  6. {Make ready 1/4 tsp of garlic powder.
  7. {Take 1/2 tbsp of honey(optional).

Instructions to make Salad & dip:

  1. Mix all the ingredients in a small bowl.
  2. Mix nicely Dip is ready to serve with salad.
  3. If you are adding more honey and want dip to be little runny then serve it over the chopped salad.
  4. Eat more of raw vegetables as salad and stay healthy.

So that's going to wrap this up for this special food salad & dip recipe. Thanks so much for reading. I am confident that you will make this at home. There is gonna be more interesting food at home recipes coming up. Remember to save this page on your browser, and share it to your family, friends and colleague. Thank you for reading. Go on get cooking!

Steps to Make Homemade Cod roe and egg rice bowl

Steps to Make Homemade Cod roe and egg rice bowl

Cod roe and egg rice bowl.

Cod roe and egg rice bowl

Hello everybody, it's Drew, welcome to my recipe page. Today, I'm gonna show you how to prepare a special dish, cod roe and egg rice bowl. One of my favorites. For mine, I will make it a little bit unique. This is gonna smell and look delicious.

Cod roe and egg rice bowl is one of the most popular of current trending foods in the world. It's simple, it is quick, it tastes delicious. It is enjoyed by millions daily. Cod roe and egg rice bowl is something which I have loved my whole life. They are fine and they look wonderful.

To get started with this recipe, we have to prepare a few ingredients. You can have cod roe and egg rice bowl using 6 ingredients and 4 steps. Here is how you cook that.

The ingredients needed to make Cod roe and egg rice bowl:

  1. {Get of salted cod or pollock roe sack.
  2. {Make ready of eggs.
  3. {Get of medium grain rice.
  4. {Prepare of sheets of roasted seaweed.
  5. {Take of water.
  6. {Make ready of salt.

Instructions to make Cod roe and egg rice bowl:

  1. PREP: Cook rice. Thaw roe if frozen..
  2. Split open roe sack and scrape out. Spread evenly on rice in bowl..
  3. Scramble eggs with some water and salt, and then layer on top of roe..
  4. Mix and eat with seaweed sheets (like riceball, handroll, etc).

So that is going to wrap this up with this special food cod roe and egg rice bowl recipe. Thanks so much for reading. I'm sure that you can make this at home. There is gonna be more interesting food at home recipes coming up. Don't forget to bookmark this page on your browser, and share it to your family, colleague and friends. Thanks again for reading. Go on get cooking!

How to Prepare Super Quick Homemade Spicy Chicken Biryani

How to Prepare Super Quick Homemade Spicy Chicken Biryani

Spicy Chicken Biryani.

Spicy Chicken Biryani

Hello everybody, it's Drew, welcome to my recipe page. Today, I will show you a way to make a distinctive dish, spicy chicken biryani. It is one of my favorites food recipes. This time, I'm gonna make it a bit tasty. This is gonna smell and look delicious.

Spicy Chicken Biryani is one of the most well liked of recent trending meals on earth. It's simple, it's fast, it tastes yummy. It is appreciated by millions every day. Spicy Chicken Biryani is something which I have loved my entire life. They're fine and they look wonderful.

To get started with this recipe, we must first prepare a few components. You can have spicy chicken biryani using 12 ingredients and 14 steps. Here is how you cook it.

The ingredients needed to make Spicy Chicken Biryani:

  1. {Get 1 of Shan or Any Biryani Masala Packet. (Available at Indian and Pakistani stores easily ).
  2. {Prepare 3/4 kg of Rice (Sella) *It's a special rice for Biryani. U can always use Regular rice as well :)..
  3. {Take 4 of onion, chopped (Large ones).
  4. {Get 3/4 cup of Oil (Vegetable ).
  5. {Take 1 tbsp of Ginger Garlic Powder or Paste.
  6. {Take 1 kg of Chicken (12 piece or more).
  7. {Take 1 1/2 cup of Water.
  8. {Take 1/2 cup of Yogurt.
  9. {Take 1/2 tsp of Orange Colour Food Colouring (To mix with 1/4 Cup water)..
  10. {Take 1 1/2 liter of Water (For boiling Rice) * Adding 1 teaspoon and 2 tablespoon of Oil to it While it's still Boiling..
  11. {Prepare 1 bunch of Coriander (Finely chopped, Optional ).
  12. {Take 4 of Green Chillies (Optional).

Instructions to make Spicy Chicken Biryani:

  1. Take a large non stick utensil. Put Oil and Chopped Onions. Start Frying Till they become light pinkish in colour..
  2. Add Ginger Garlic Powder or Paste to it along with chicken pieces. (Mix them with the help of a wooden spoon).
  3. Add Shan Biryani Masala Packet and 1 1/2 Cup Water..
  4. Continue cooking it on slow flame till the chicken is tender..
  5. Add Yogurt to it and leave it for another 10 minutes. (Do mix it after adding yogurt)..
  6. Biryani Masala is ready. ( Don't dry it out nor make it too runny, It will be a thick masala mixture).
  7. Soak Sella rice for at least 60 minutes prior boiling. Regular rice for 20 minutes soaking..
  8. Boil 1 1\2 liter Water. Add 1 teaspoon salt to it and 2 tablespoon Oil..
  9. Boil the Rice till they are done. Drain all the Water..
  10. Now Take another large cooking utensil and spread rice layer evenly..
  11. Add Biryani Masala Mixture on top of it. Then add another layer of Rice..
  12. Mix food colouring with warm water and spread on this top layer of Rice. (Keep it on slow flame for 20 minutes )..
  13. Mix it with a flat spoon before serving..
  14. You can garnish it with coriander and green chillies..

So that's going to wrap it up for this exceptional food spicy chicken biryani recipe. Thanks so much for reading. I'm confident that you will make this at home. There is gonna be interesting food in home recipes coming up. Remember to bookmark this page in your browser, and share it to your family, colleague and friends. Thanks again for reading. Go on get cooking!

Step-by-Step Guide to Make Perfect Crispy Chicken Fingers😋🍤🍟

Step-by-Step Guide to Make Perfect Crispy Chicken Fingers😋🍤🍟

Crispy Chicken Fingers😋🍤🍟.

Crispy Chicken Fingers😋🍤🍟

Hello everybody, it is John, welcome to our recipe site. Today, I will show you a way to make a special dish, crispy chicken fingers😋🍤🍟. It is one of my favorites. For mine, I'm gonna make it a bit unique. This will be really delicious.

Crispy Chicken Fingers😋🍤🍟 is one of the most popular of recent trending meals in the world. It is appreciated by millions every day. It is simple, it's fast, it tastes delicious. Crispy Chicken Fingers😋🍤🍟 is something which I've loved my whole life. They're nice and they look fantastic.

To begin with this recipe, we have to prepare a few ingredients. You can have crispy chicken fingers😋🍤🍟 using 13 ingredients and 4 steps. Here is how you cook that.

The ingredients needed to make Crispy Chicken Fingers😋🍤🍟:

  1. {Make ready of chicken strips.
  2. {Take of paprika powder.
  3. {Make ready of salt.
  4. {Take of black pepper powder.
  5. {Make ready of egg beaten.
  6. {Get of oregano.
  7. {Prepare of garlic powder.
  8. {Make ready of soya sauce.
  9. {Prepare of plain flour.
  10. {Take of corn flour.
  11. {Get of bread crumbs or as required.
  12. {Make ready of oil for frying.
  13. {Get of french fries for serving (for french fries visit my kitchen).

Instructions to make Crispy Chicken Fingers😋🍤🍟:

  1. In a mixing bowl add chicken strips and all the ingredients.
  2. Mix well and let it rest for half an hour then coat them into bread crumbs.
  3. Heat oil in a wok and deep fry chicken strips untill turns golden keep the flame medium low.
  4. Serve with some french fries and tomato ketchup.

So that is going to wrap this up for this special food crispy chicken fingers😋🍤🍟 recipe. Thanks so much for reading. I'm sure you will make this at home. There's gonna be more interesting food at home recipes coming up. Remember to bookmark this page on your browser, and share it to your loved ones, colleague and friends. Thanks again for reading. Go on get cooking!

How to Prepare Award-winning Mike's Pineapple Chicken Skewers

How to Prepare Award-winning Mike's Pineapple Chicken Skewers

Mike's Pineapple Chicken Skewers.

Mike's Pineapple Chicken Skewers

Hello everybody, I hope you are having an amazing day today. Today, we're going to prepare a distinctive dish, mike's pineapple chicken skewers. It is one of my favorites. For mine, I will make it a little bit tasty. This will be really delicious.

Mike's Pineapple Chicken Skewers is one of the most popular of current trending foods in the world. It is appreciated by millions daily. It is simple, it's quick, it tastes yummy. Mike's Pineapple Chicken Skewers is something which I have loved my entire life. They're fine and they look fantastic.

To begin with this recipe, we have to prepare a few ingredients. You can have mike's pineapple chicken skewers using 25 ingredients and 8 steps. Here is how you can achieve it.

The ingredients needed to make Mike's Pineapple Chicken Skewers:

  1. {Take of Meats.
  2. {Get 4 of Extra Large Boneless Chicken Breasts [fat trimmed].
  3. {Take of Vegetables & Fruits.
  4. {Prepare 4 large of Green Bell Peppers.
  5. {Take 1 can of Pineapple Chunks.
  6. {Make ready 2 large of Purple Onions.
  7. {Get of Marinade.
  8. {Prepare 1 can of 20 oz Dole Crushed Pineapples.
  9. {Prepare 1 1/2 cup of Teriyaki Sauce [your favorite brand].
  10. {Get 1 tbsp of Minced Ginger.
  11. {Take 2 tbsp of Garlic Chili Sauce.
  12. {Get 1 of Bottle Teriyaki Miso Sauce [optional] [not to be mixed in marinade].
  13. {Make ready of Optional Brine.
  14. {Make ready 1/2 cup of Sugar.
  15. {Prepare 1/2 cup of Salt.
  16. {Prepare of Equipment.
  17. {Take 1 gallon of Sized Ziplock Bag.
  18. {Take 1 of Pair Barbecue Tongs.
  19. {Make ready 8 of Metal Skewers.
  20. {Take 1 large of Bowl.
  21. {Prepare 1 small of Pot.
  22. {Make ready 1 of Brush.
  23. {Get of Serving Suggestions.
  24. {Get 1 of Tortilla - Naan - Pita Breads [or bad of your choosing].
  25. {Prepare 1 of White Rice.

Steps to make Mike's Pineapple Chicken Skewers:

  1. TO BRINE CHICKEN: In a small pot, heat two cups water, salt and sugar until dissolved. Add some ice cubes to cool the mixture down. Pour in large bowl. Add chicken breasts. Add just enough cold water to cover breasts. Add four cups ice and mix up. Place in fridge to brine for five to six hours minimum or no longer than eight hours. You can also pre-cut your chicken into 1"x1" cubes and brine for 2 1/2 to 4 hours..
  2. Add everything in the Marinade section [except for the Teriyaki Miso Sauce] in a Ziplock bag and mix..
  3. Pull chicken from brine and place in marinade bag. Allow chicken to marinate for two hours or longer. Reserve marinade sauce for later use..
  4. Chop all vegetables in 1"x1" cubes. Cut chicken in 1"x1" cubes as well. Thread chicken on metal skewers starting and ending with chicken pieces. Thread vegetables and pineapple in between chicken pieces..
  5. OPTIONAL: Lightly brush constructed skewers with Teriyaki Miso Sauce. This sauce is optional since it does have a slightly bitter Miso taste to it. However, by adding the pineapple chunks, it negates the flavor almost entirely..
  6. Grill until fully cooked at 425° to 450°. Usually about 15 minutes. Be careful not to burn by turning skewers regularly. Serve with Tortillas, Naan bread or any other breads that you can place your chicken in..
  7. You can also bake these. I use a convection oven like the one pictured. If you choose to bake, add chicken chunks, vegetables and pineapples on a nonstick sheet or oven safe liner and bake at 425° for 30 minutes. Serve with white rice..
  8. Lastly, you can use your pineapple marinade to make a thick sauce to drizzle over rice. Do this by bringing marinade to a hard boil and adding 2 tablespoons corn starch mixed with a small amount of water in a seperate bowl. Then, slowly add it to your simmering marinade. Simmer until sauce thickens to the consistency you desire.The longer it simmers the thicker your sauce will become..

So that's going to wrap this up for this exceptional food mike's pineapple chicken skewers recipe. Thanks so much for reading. I am confident you can make this at home. There is gonna be interesting food in home recipes coming up. Remember to bookmark this page on your browser, and share it to your loved ones, friends and colleague. Thanks again for reading. Go on get cooking!

Recipe of Perfect Doodhi Thepala (bottle gourd paratha/indian flat
bread)

Recipe of Perfect Doodhi Thepala (bottle gourd paratha/indian flat bread)

Doodhi Thepala (bottle gourd paratha/indian flat bread).

Doodhi Thepala (bottle gourd paratha/indian flat bread)

Hello everybody, it's Drew, welcome to our recipe site. Today, I'm gonna show you how to make a special dish, doodhi thepala (bottle gourd paratha/indian flat bread). It is one of my favorites food recipes. For mine, I'm gonna make it a little bit unique. This will be really delicious.

Doodhi Thepala (bottle gourd paratha/indian flat bread) is one of the most favored of current trending foods on earth. It is enjoyed by millions daily. It is simple, it is quick, it tastes yummy. They are nice and they look wonderful. Doodhi Thepala (bottle gourd paratha/indian flat bread) is something which I have loved my whole life.

To begin with this particular recipe, we have to prepare a few components. You can cook doodhi thepala (bottle gourd paratha/indian flat bread) using 15 ingredients and 6 steps. Here is how you cook that.

The ingredients needed to make Doodhi Thepala (bottle gourd paratha/indian flat bread):

  1. {Take 2 of cup-wheat glour.
  2. {Make ready 1 1/2 cup of - finally greated dudhi.
  3. {Make ready 1/4 cup of - chikapea flour(besan).
  4. {Take 1/2 cup of - curd.
  5. {Take 1 tsp of - Tumeric powder.
  6. {Prepare 1 of tsp- red chilli powder.
  7. {Make ready 1/2 tbsp of coriander leaves finally.
  8. {Prepare of chopped.
  9. {Take 1 tsp of - cumin seeds.
  10. {Take 1 of -coriander powder.
  11. {Take 1/2 of tsp- cumin seeds powder.
  12. {Prepare 1 of tap - ginger garlic paste.
  13. {Prepare 2 tbsp of -oil.
  14. {Get to taste of Salt.
  15. {Get As needed of oil for roasting the heplas.

Steps to make Doodhi Thepala (bottle gourd paratha/indian flat bread):

  1. Peel and grate the doodhi finally..
  2. In a mixing bowl take add all ingredients and mix well.knead into a semi soft dough.apply the oil knead it well again..
  3. Taking a small portion of the dough,,roll into circular shape using a rolling pin. It should not be too thin nor too thick..
  4. Heat a tawa/griddle roast the thepla on medium heat and cook for 2 min..
  5. Apply some oil /ghee on the top flip it and press slightly cook for thepla roasted on both sides until golden brown..
  6. Serve the Delicious doodhi thepla with curd,curry, pickle,tomato ketchup..

So that's going to wrap it up for this exceptional food doodhi thepala (bottle gourd paratha/indian flat bread) recipe. Thanks so much for your time. I am confident that you will make this at home. There's gonna be more interesting food in home recipes coming up. Remember to bookmark this page in your browser, and share it to your loved ones, friends and colleague. Thanks again for reading. Go on get cooking!

Step-by-Step Guide to Make Ultimate The perfect moussaka

Step-by-Step Guide to Make Ultimate The perfect moussaka

The perfect moussaka.

The perfect moussaka

Hey everyone, I hope you're having an amazing day today. Today, I will show you a way to make a special dish, the perfect moussaka. It is one of my favorites. This time, I will make it a little bit tasty. This will be really delicious.

The perfect moussaka is one of the most favored of recent trending foods on earth. It's enjoyed by millions every day. It is simple, it's quick, it tastes delicious. The perfect moussaka is something that I have loved my whole life. They are fine and they look wonderful.

To begin with this recipe, we must first prepare a few ingredients. You can cook the perfect moussaka using 11 ingredients and 15 steps. Here is how you can achieve that.

The ingredients needed to make The perfect moussaka:

  1. {Get 3-4 of eggplants.
  2. {Prepare 3-4 of zucchinis.
  3. {Get of béchamel sauce.
  4. {Prepare of For the ground meat.
  5. {Prepare 300 g of to 350 g ground beef.
  6. {Prepare 2 of tomatoes blended in the food processor.
  7. {Prepare of salt, pepper.
  8. {Prepare 1 of little sugar.
  9. {Take 1 of cinnamon stick.
  10. {Make ready 1 of onion, finely chopped.
  11. {Take of grated kefalotyri (traditional Greek hard salty yellow cheese).

Steps to make The perfect moussaka:

  1. Cut the eggplants and the zucchinis into thin slices..
  2. Spread them out in a baking sheet, sprinkle with olive oil and season lightly with salt..
  3. Plae the baking sheet in the oven at 170°C - 180°C on the first rack for about 40 to 50 minutes so that vegetables dry from their liquids..
  4. Prepare the béchamel sauce..
  5. As soon as you prepare the béchamel sauce, cover it with cling film to prevent a skin from forming..
  6. Ground meatSauté the onion lightly in olive oil or if you want a lighter taste, just boil it together with the ground meat..
  7. Add the ground beef to the oil and brown it..
  8. Add the tomato, salt, pepper, cinnamon and water, though not too much..
  9. Simmer until all its liquids are absorbed..
  10. Place one layer of eggplants and one layer of zucchinis in a baking tray..
  11. If you still have extra slices, repeat the process..
  12. Spread the ground meat mixture over everything, distributing it evenly..
  13. Spread the béchamel sauce evenly on the top..
  14. Sprinkle with the cheese..
  15. Bake at 200°C until the béchamel sauce is golden brown and the cheese has melted..

So that is going to wrap it up with this special food the perfect moussaka recipe. Thank you very much for reading. I'm confident that you will make this at home. There is gonna be interesting food in home recipes coming up. Remember to save this page in your browser, and share it to your family, friends and colleague. Thanks again for reading. Go on get cooking!

Easiest Way to Prepare Speedy Macrobiotic Style Chana Masala

Easiest Way to Prepare Speedy Macrobiotic Style Chana Masala

Macrobiotic Style Chana Masala.

Macrobiotic Style Chana Masala

Hey everyone, I hope you are having an amazing day today. Today, I'm gonna show you how to prepare a distinctive dish, macrobiotic style chana masala. One of my favorites. For mine, I will make it a little bit tasty. This is gonna smell and look delicious.

Macrobiotic Style Chana Masala is one of the most favored of current trending meals in the world. It's appreciated by millions daily. It's simple, it is quick, it tastes yummy. Macrobiotic Style Chana Masala is something that I have loved my entire life. They're fine and they look wonderful.

To begin with this recipe, we must prepare a few components. You can cook macrobiotic style chana masala using 13 ingredients and 17 steps. Here is how you can achieve that.

The ingredients needed to make Macrobiotic Style Chana Masala:

  1. {Get 1 of Onion.
  2. {Prepare 1 small of piece Ginger.
  3. {Take 2 of Carrots.
  4. {Get 300 grams of Chickpeas.
  5. {Make ready 1 tbsp of Cumin seeds.
  6. {Take 2 tsp of Salt.
  7. {Get 2 tsp of Turmeric.
  8. {Get 1 dash of Chilli powder.
  9. {Make ready 1 tbsp of Soy sauce.
  10. {Prepare 1 of Canola oil.
  11. {Get 1 tbsp of Barley miso.
  12. {Prepare 1 tbsp of White sesame paste.
  13. {Prepare 2 tsp of Garam masala.

Instructions to make Macrobiotic Style Chana Masala:

  1. [Ingredients] (6 servings).
  2. Soak the chickpeas in water overnight..
  3. Drain the chickpeas and transfer to a pressure cooker. Add 3 times as much water as chickpeas and heat over high heat. After the pin pops up, turn down the heat to low and simmer for about 20 minutes..
  4. Roughly chop the onion..
  5. Finely chop the ginger..
  6. Grate the carrot..
  7. Pour a generous amount of canola oil in a pan, and fry the cumin seeds over medium heat..
  8. When the oil temperature goes up and the cumin seeds start to pop, add the ginger and fry until fragrant..
  9. Add the onion and fry over medium-low heat slowly until golden brown..
  10. Add the carrot, turn up the heat a little to evaporate the liquid while frying, and mix everything together..
  11. Add the turmeric and chili powder..
  12. Add the cooked chickpeas and continue frying..
  13. Add the water you cooked the chickpeas in and salt to the pan, and mix. Put the barley miso and white sesame paste in the middle of the pan and simmer for about 15 minutes..
  14. Take off the lid, and stir well to blend in the miso and white sesame seed paste. (By steaming the miso, it becomes easier to blend in.).
  15. Add the garam masala right before you turn off the heat..
  16. Add the soy sauce, mix well and it's done..
  17. Serve with brown rice!.

So that's going to wrap it up for this special food macrobiotic style chana masala recipe. Thank you very much for reading. I am confident that you will make this at home. There's gonna be interesting food in home recipes coming up. Don't forget to save this page on your browser, and share it to your loved ones, colleague and friends. Thank you for reading. Go on get cooking!